• About Inkle
  • About Me
  • Contact
  • Daily Band Practice: The Gallery
  • Project Tutorials
  • Teaching
  • Translate inkled pink

inkled pink

~ warp, weave, be happy!

inkled pink

Tag Archives: sew

A Tisket, A Tasket, Weave an Inkle Basket

03 Wednesday Apr 2013

Posted by Jennifer Williams a.k.a. inkledpink in Projects, Tutorials

≈ 39 Comments

Tags

basket, inkle band, sew, thrumbs, Weaving

I’ve always wanted to try basket making. Update: 8/29/18 I have tried basket weaving and now I have, oh my, it is a wonderful as I had imagined. They are beautiful and useful- the same as inkle bands. So, I got this crazy idea; why not weave a basket with inkle bands?! Inkle band basket tutorial final

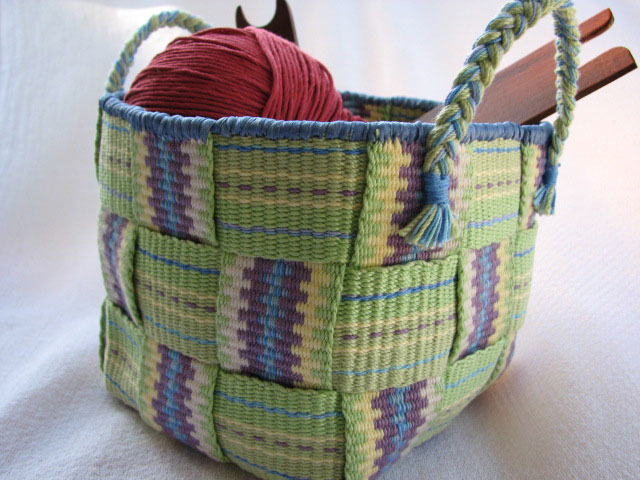
My inkle basket is created by cutting two inkle bands into strips and weaving them together in a simple over under pattern. For a little contrast, I used two different bands to make the basket , but it would look really nice made out of one pattern too. My band was 1 1/2″ wide and the final basket is 4 1/2″ L x 4 1/2″ W x 4 1/2″ H.

Supplies needed:

1. Inkle band(s) 2. masking tape 3. extra yarn, floss, or thread 4. all purpose glue 5. knitting needle (optional) 6. scissors 7. straight pins and embroidery needle 8. something to measure with 9. clothes pins

1. Inkle band(s) 2. masking tape 3. extra yarn and thread 4. all purpose glue 5. knitting needle (optional) 6. scissors 7. straight pins and embroidery needle 8. something to measure with 9. clothes pins (*not pictured: 1/8″ (3mm) wide coordinating satin ribbon and sewing thread)

Update: 8/29/18 Thanks to a fellow Inkle Weaver in the Inkle facebook group an error was found in my calculations below. I am ever grateful for the discovery! The update is in italics below.

We have to do a bit of math to determine the length of inkle band you will need.

Multiply width of inkle band by 3 = width of basket base
Multiply width of basket base by 3 = length of one *vertical inkle strip
Multiply length of one *vertical inkle strip by 6 = total length of band needed for *vertical strips of the basket

Then:

Multiply width of basket base by 4 = length of one *horizontal inkle strip
Multiply the width of the band by 2. Add to length of one horizontal inkle strip – this will allow for overlap of the woven strips)
Multiply length of one *horizontal inkle strip by 3= total length of band needed for *horizontal strips of the basket

*vertical and horizontal refer to the direction of the strips as they are woven to make the sides of the basket.

example: (for easy math imagine your band is 1 inch wide)
1″ x 3 = 3″ (Width of basket base)
3″ x 3 = 9″ (Length of one vertical strip)
9″ x 6 = 54″ (Total length of band needed for Vertical Strips: excluding fringe)
3″ x 4 = 12″ (Length of one horizontal strip)
2 x 1″ = 2″ (width of inkle band multiplied by 2)
12″ + 2″ = 14″ (Length of one horizontal strip plus width of band x2)
14″ x 3 = 42″ (Total length of band needed for Horizontal Strips of the basket

The example basket would measure 3″L x 3″W x 3″H.

Following the example above, with two bands, as I did, you would need one band at least 54″ for the vertical strips and one at least 42″ for the horizontal strips. If using only one band the two totals need to be added together. Your band would need to be at least 96″. These totals are excluding fringe. The width of the bands will determine the final dimensions of your basket.

So let’s get started!

You will need 6 vertical strips and 3 horizontal strips each cut to the lengths you calculated.

To prevent the ends from raveling, seal the ends. Thread a needle with sewing thread. Put a bit of glue on the end of the thread as wide as the band. I call this glue thread. Yes, I thought long and hard on that name.
inkle band basket tutorial step 9.5.

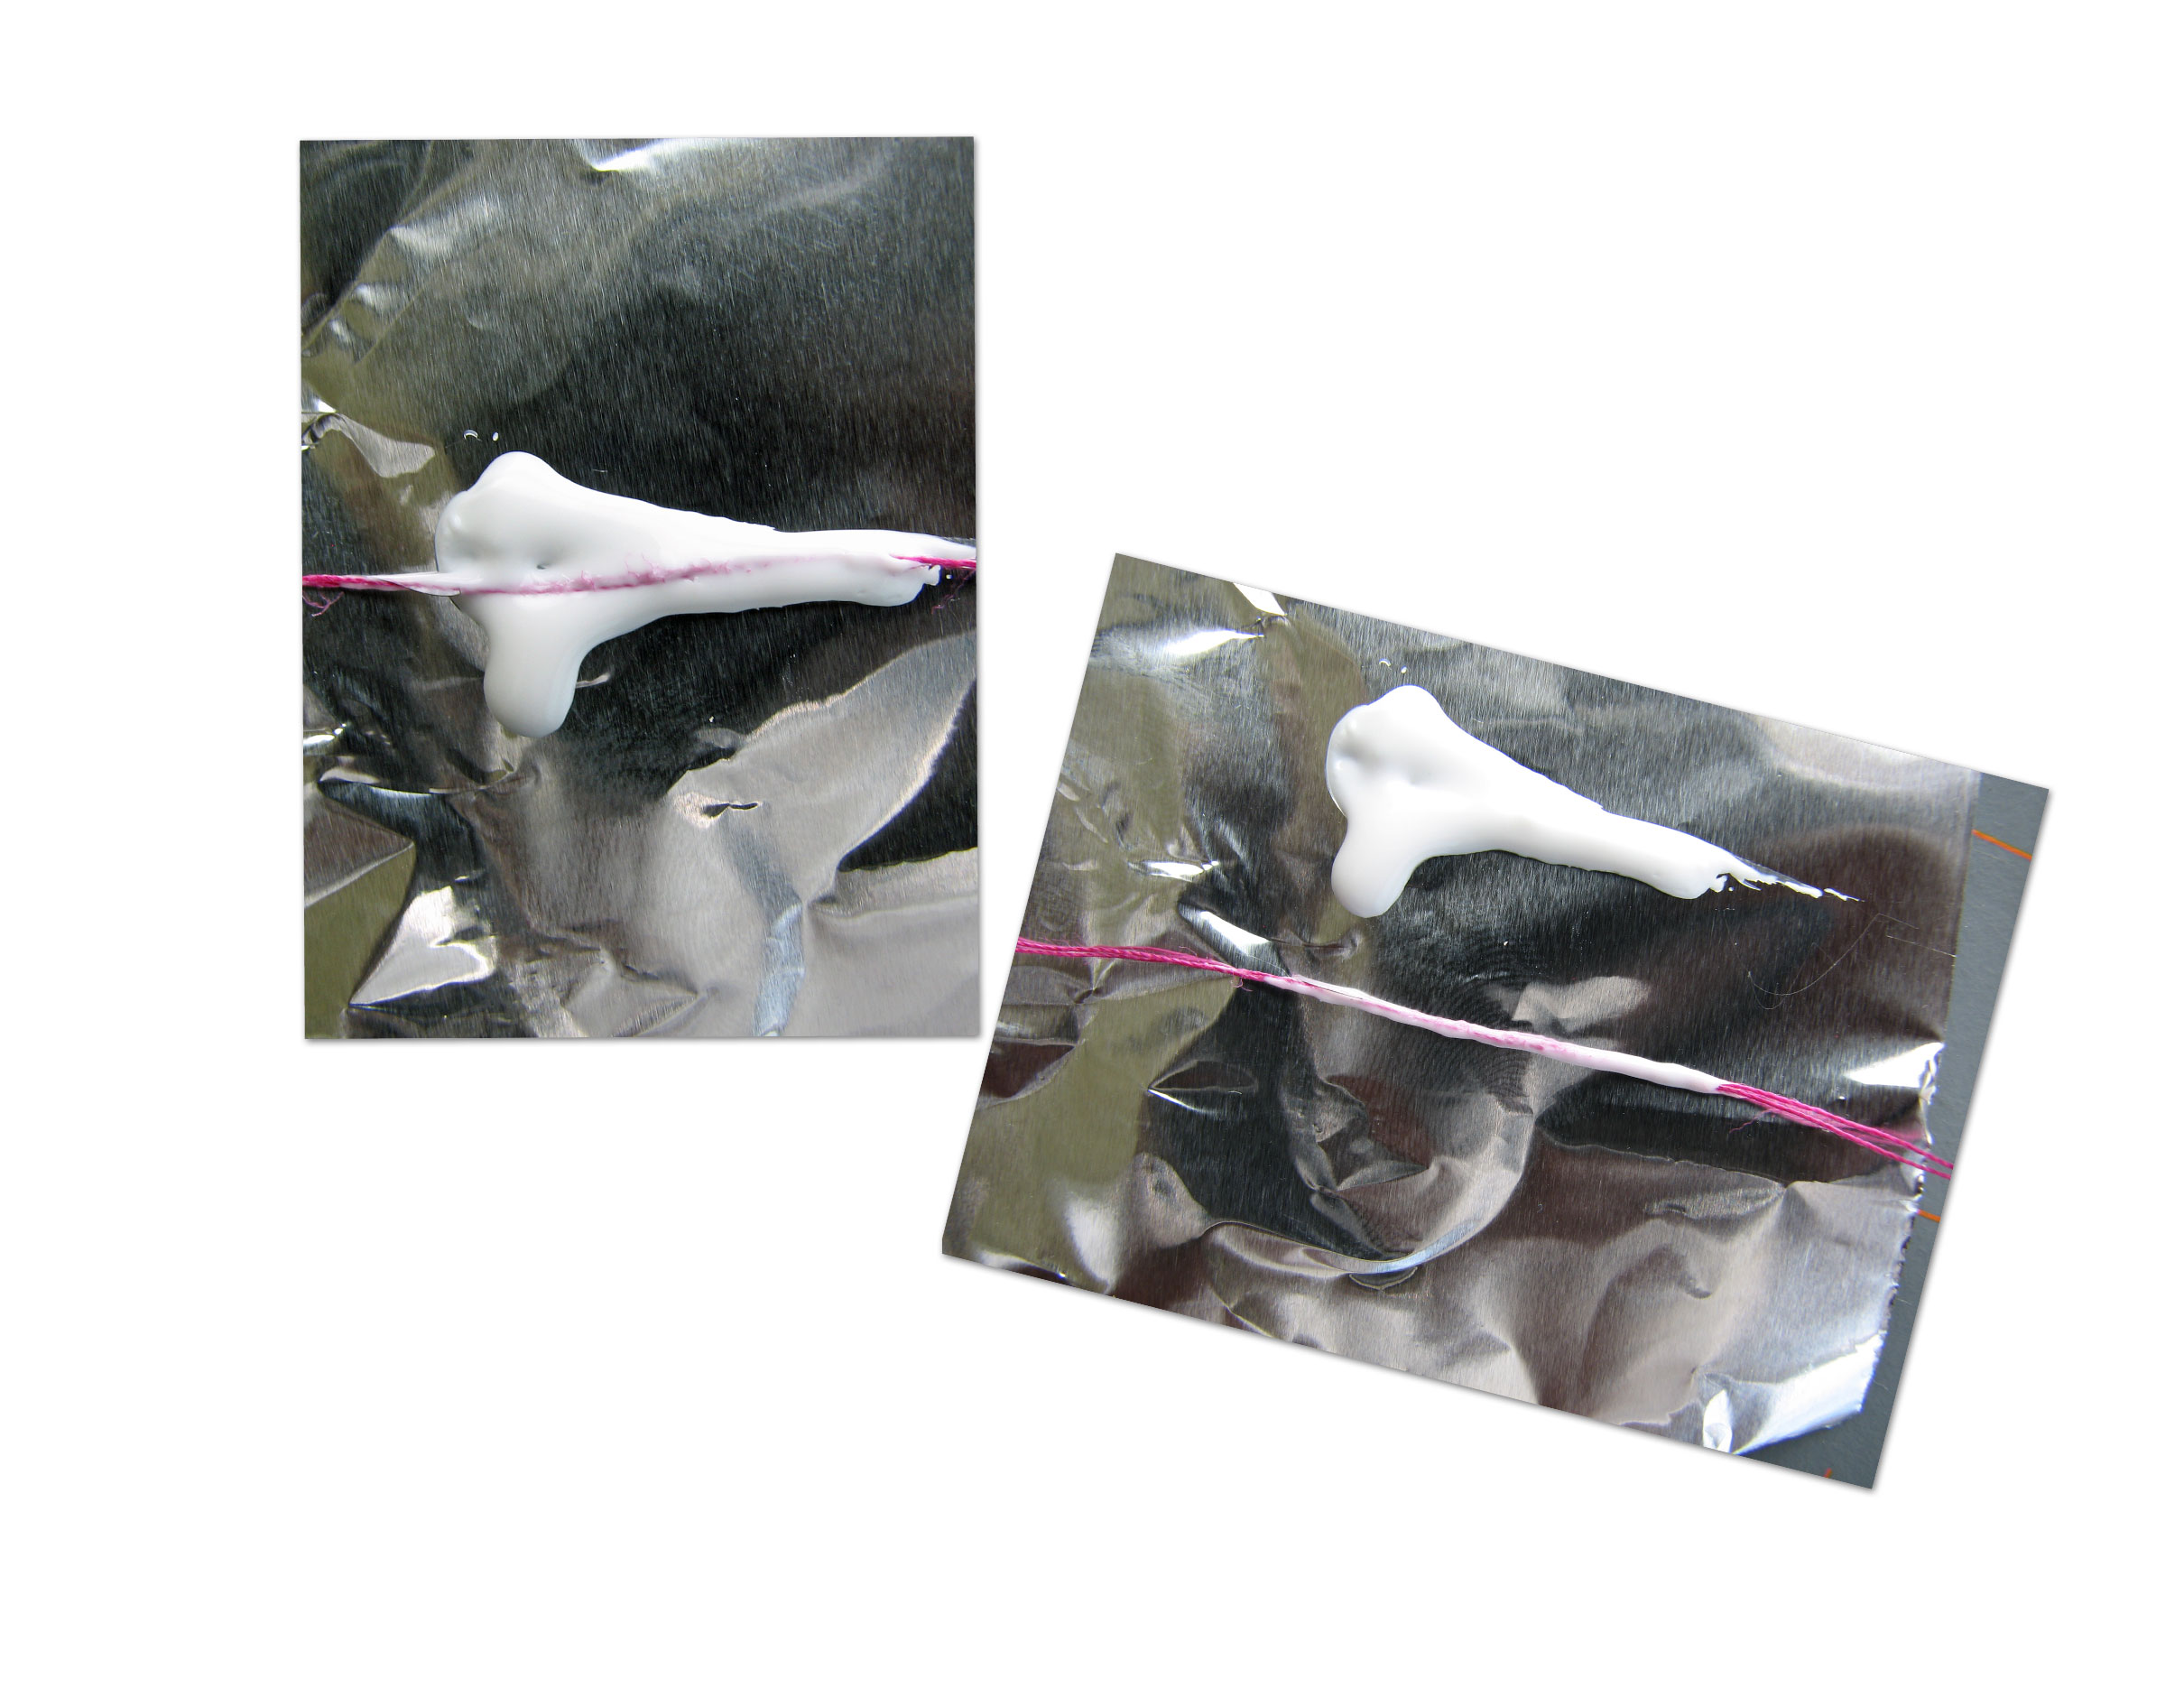
Insert the needle into the “tunnel” between the warp layers, one or two rows from the top edge. Pull the needle and thread all the way through until the glue thread is sandwiched in the band. Press firmly with your fingers to seal.
inkle band basket tutorial step 9

Trim the strip above the glue thread row. Apply glue along the top of the cut edge. Let the glue dry for at least 15 minutes. Your strips should be good and sealed now.
Inkle band basket tutorial step 9.2

Now we are ready to make a basket!

Begin with 4 vertical strips placed like this.
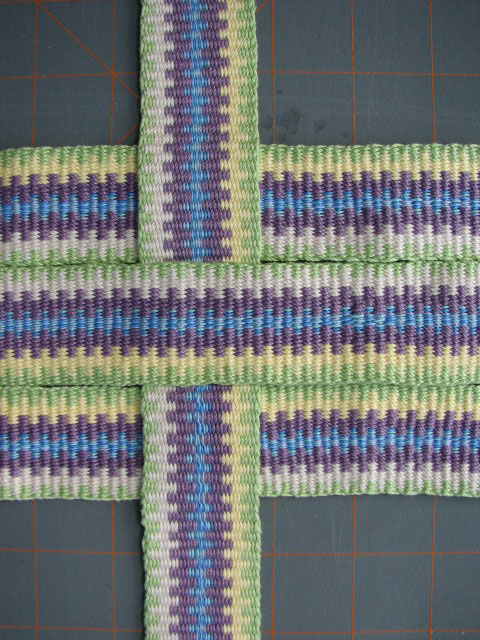
 Inkle band basket tutorial step 1

Then:
Inkle band basket tutorial step 2

And last strip placed; your base is built. The base square should be centered with the strips edges being evenly lined up on all four sides. Tip: Use a knitting needle to help nudge the strips into place.
Inkle band basket tutorial step 3

Use the masking tape or straight pins to secure the base so it doesn’t shift while you weave the walls.
Inkle band basket tutorial step 4

Begin building the walls by weaving a horizontal strip around the base strips.
Inkle band basket tutorial step 5 Inkle band basket project step 6

Add glue to the overlap of the horizontal strip inside the basket and weave the overlap behind the next vertical strip to hide it.
Inkle band basket project step 7

inkle band basket project step 8

Oops, the strips in this picture are not sealed…

As you continue building the walls of the basket it might be helpful to fold the vertical strips over the horizontal strips to aid in keeping everything in place.

This is what it will look like when all of the sides are built.
Inkle band basket project step 10

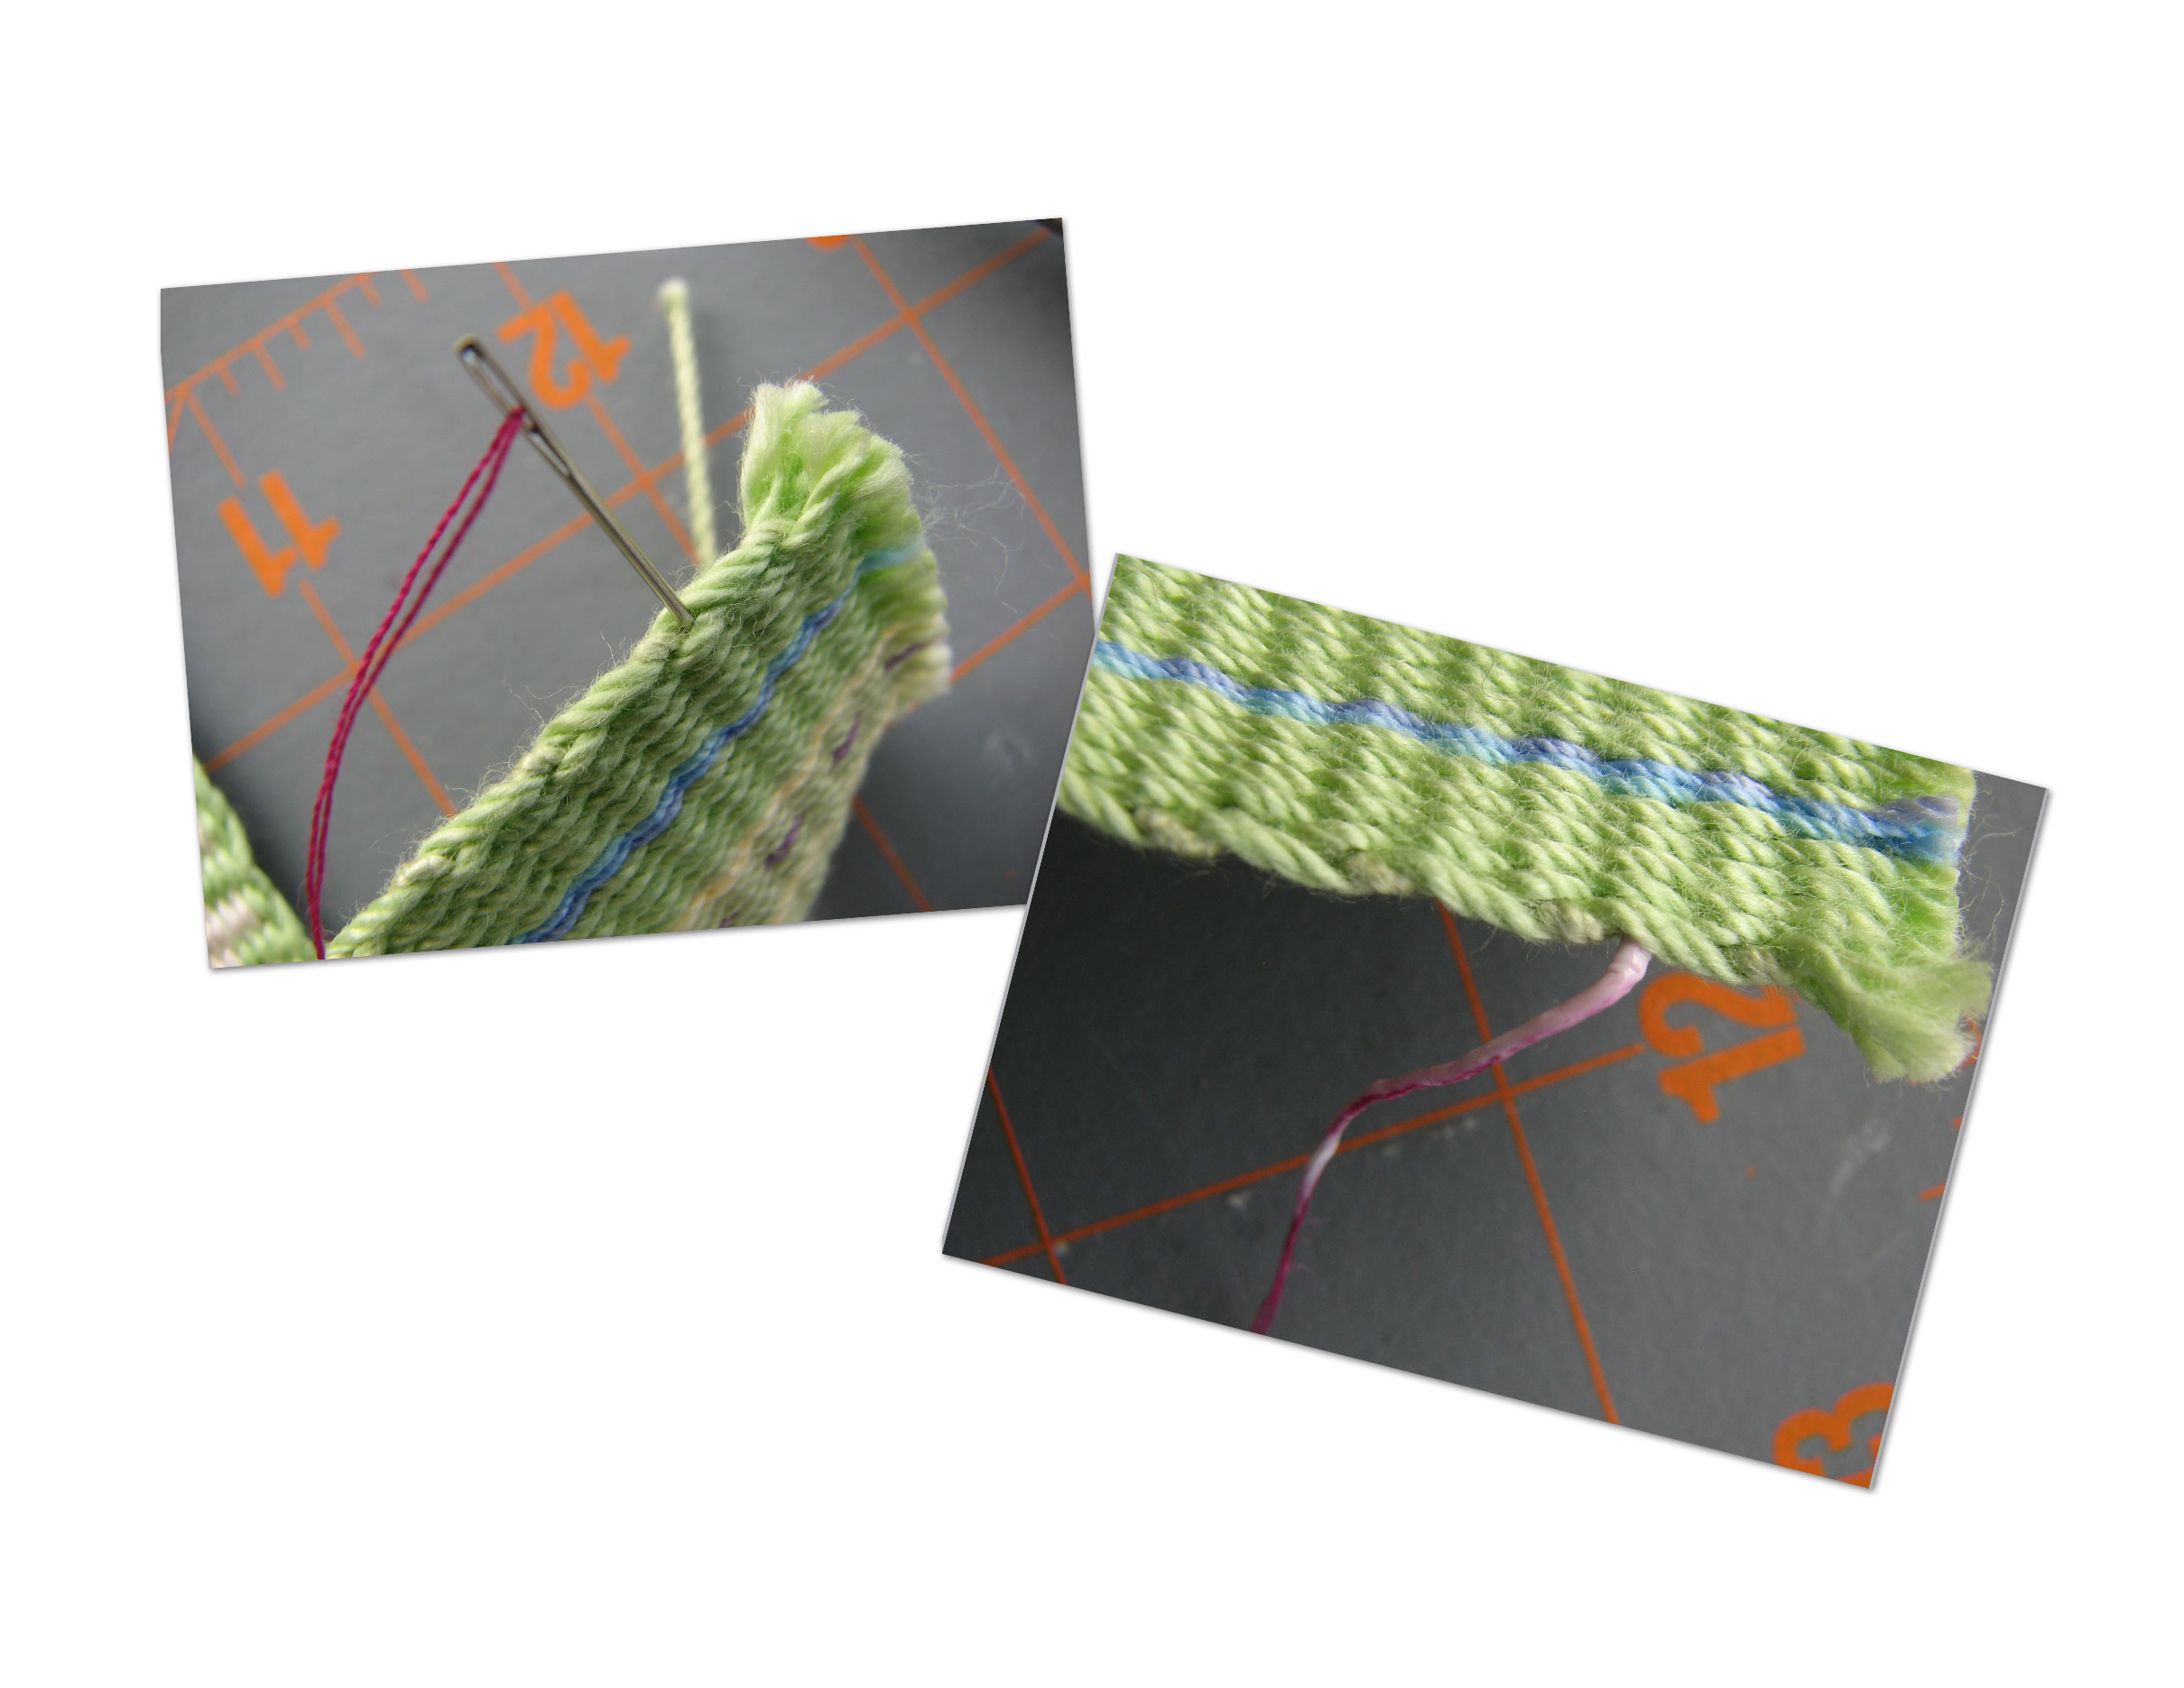
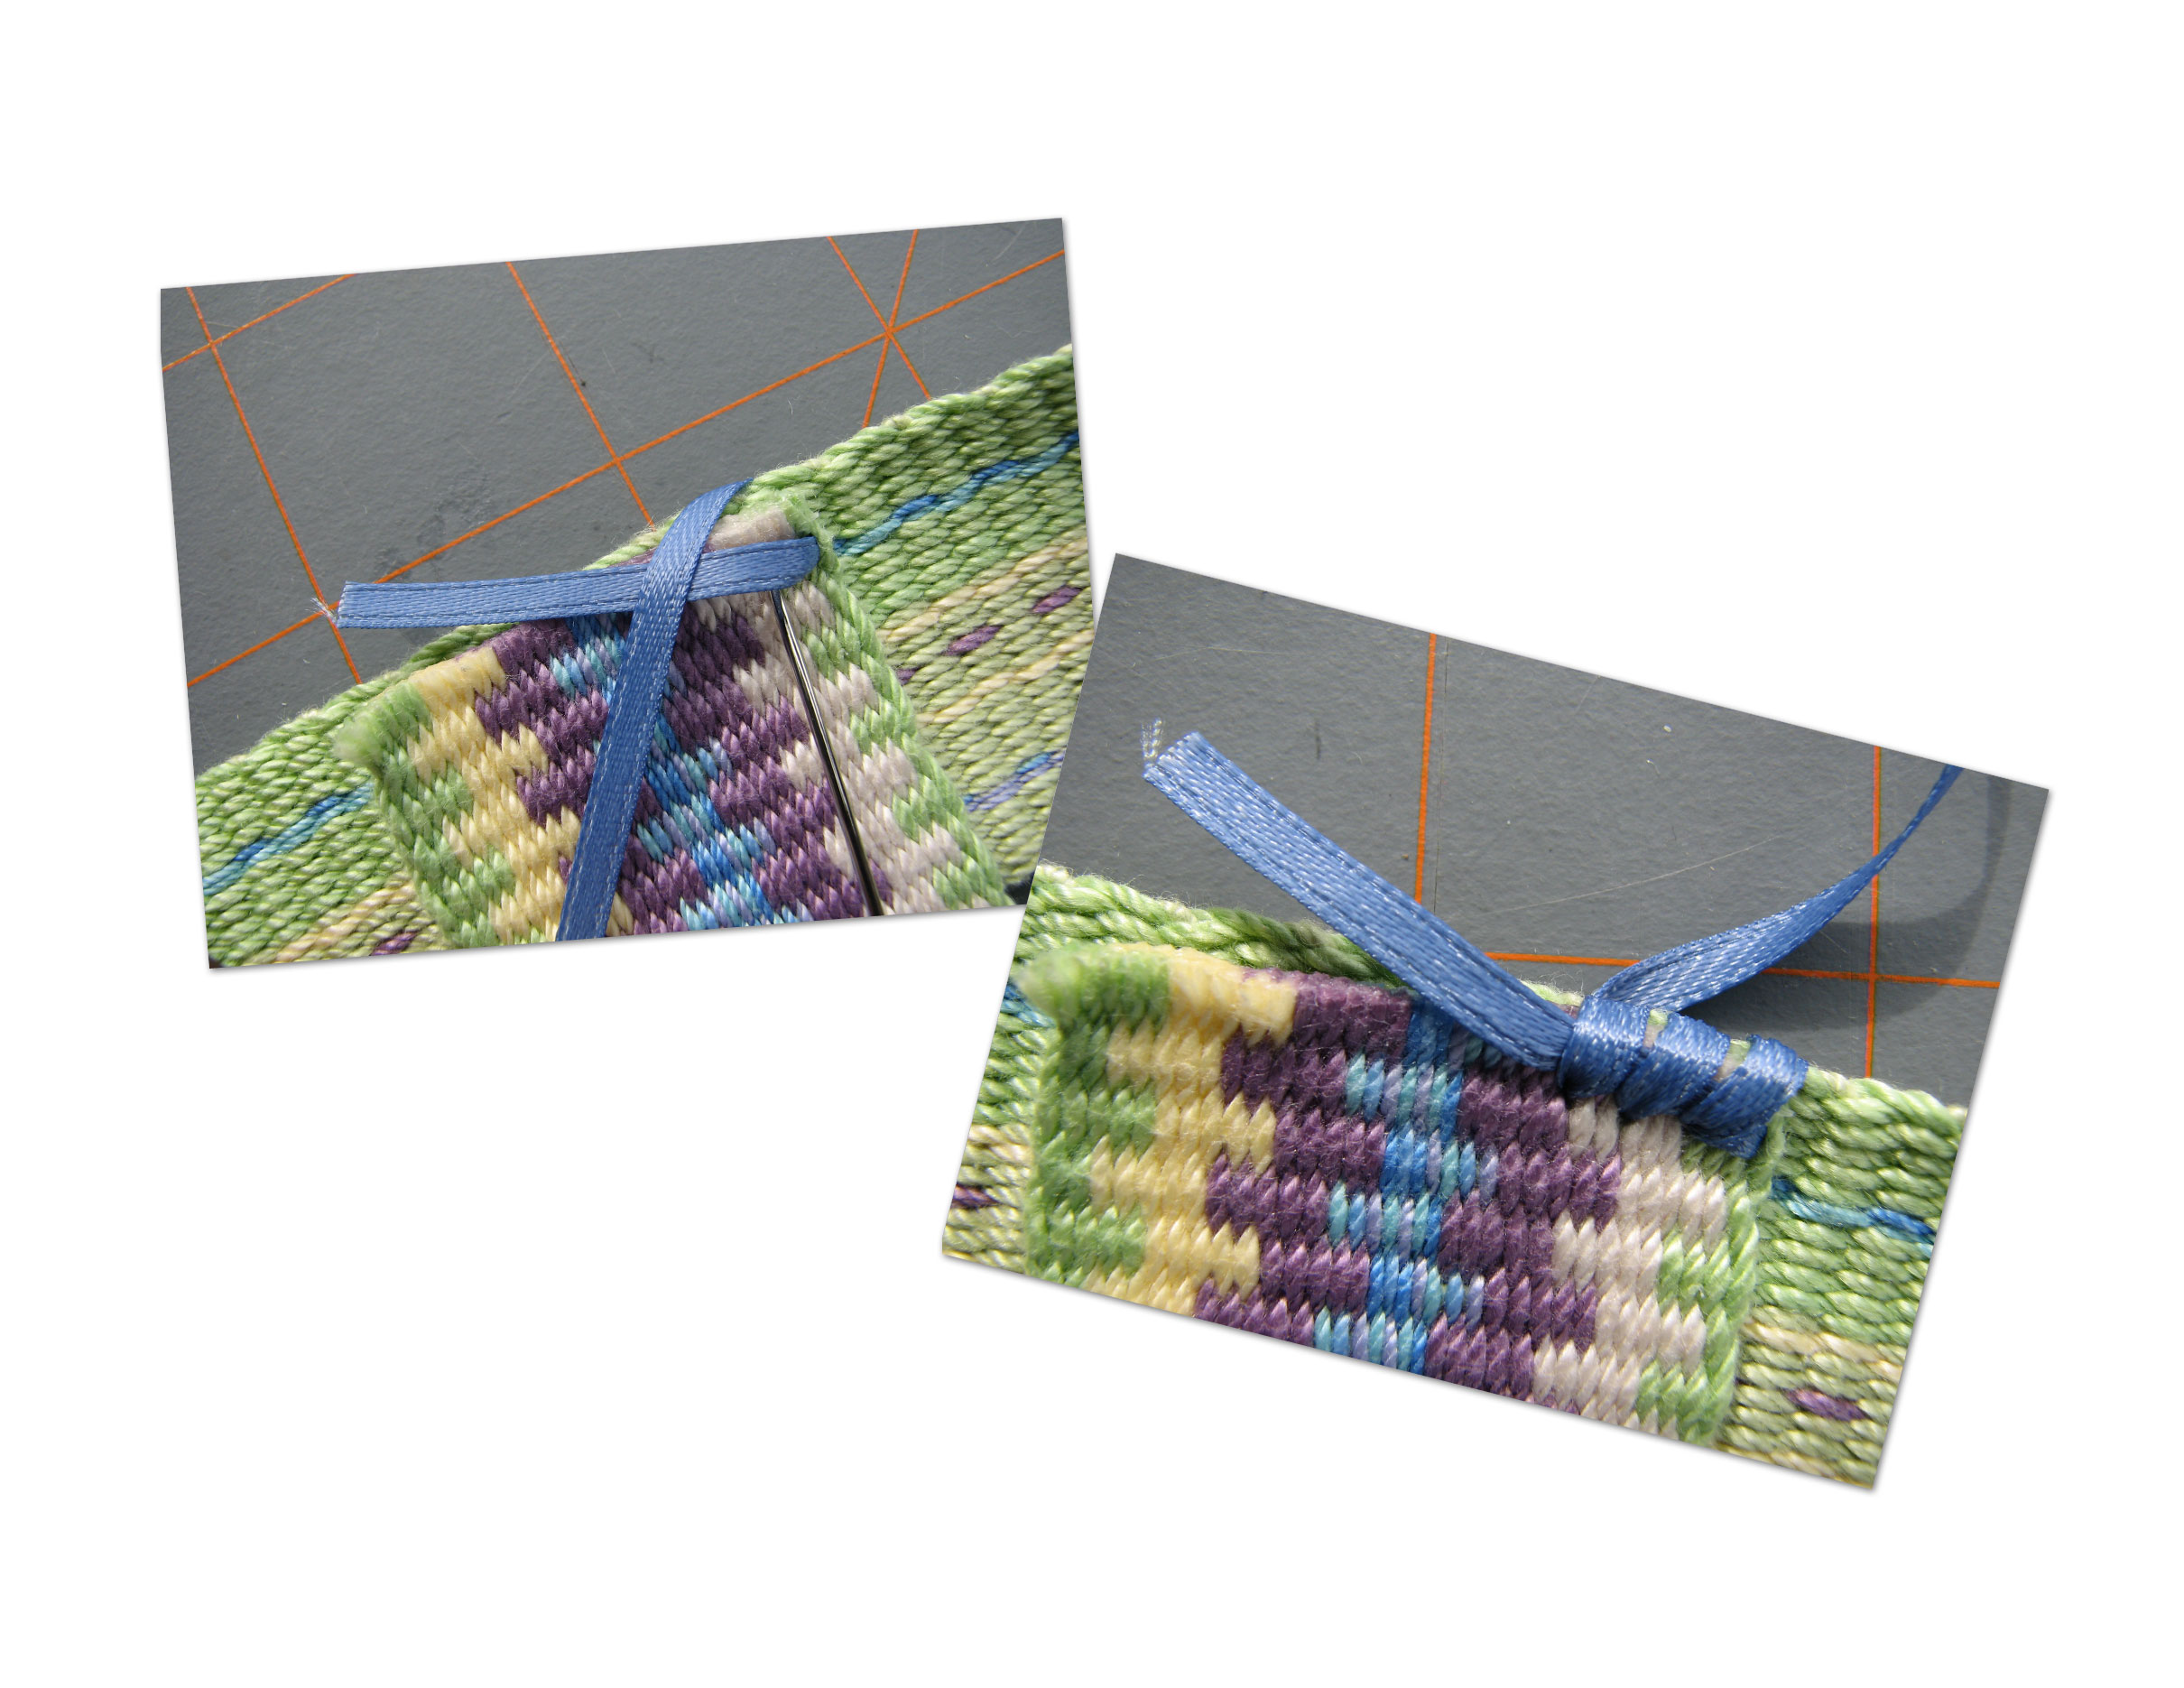
Whipstitch around the top edge with the embroidery needle and ribbon, securing the vertical strips to the horizontal strip. Be sure to insert the needle below the glue thread row.
Inkle band basket tutorial step 11.

Braid handles out of the fringe you cut off or lengths of yarn. Wrap the ends with yarn and sew to the basket.Inkle band basket embroidery edge

And ta-da, you have a woven inkle basket!
Inkle band basket tutorial final

My basket is filled with some fibery goodness that just arrived in the mail. Can’t wait to empty it and fill it again. What will you fill your basket with?

warp, weave, be happy! ~ Jennifer

Share this:

  • Click to share on Pinterest (Opens in new window) Pinterest
  • Click to email a link to a friend (Opens in new window) Email
  • Click to share on Facebook (Opens in new window) Facebook
  • Click to share on X (Opens in new window) X
Like Loading...

The Gift That Inkle Saved

16 Monday Apr 2012

Posted by Jennifer Williams a.k.a. inkledpink in Design, Projects

≈ 7 Comments

Tags

border, craft, DMC floss, gift, inkle, inkle band, pillow, piping, projects, sew, silk

What gift should I give to dear friends celebrating their 7th wedding anniversary? Hmmm… Oh, wait, I know, how about the gift I started making for them 7 years ago for their wedding and never finished!

Here it is ready to be wrapped.

The back.

Why did this pillow take me so long to complete? Because I can embroider, sew basic straight seams, but I can’t sew piping! Sometimes my ideas are bigger than my abilities and I can fake it ’til I make. Not this time.

I had such high hopes for this gift. My friends are bird watchers, so embroidering birds was an obvious theme. The pillow is made of the same color dupioni silk as the dresses that the bridesmaids wore. Perfect, right?

Nope. This project went so wrong.

I ripped it apart, sewed it again, apart, sew, apart, sew, until, out of frustration, I put it in a box and there it stayed. For seven years. I thought of it every year around their anniversary, but my skills had not changed and neither did the state of the pillow.

What the pillow was waiting for was for me to learn how to inkle weave. An inkle band added the perfect finish to what I couldn’t achieve before.

I wove the band with DMC embroidery floss, which gave the band a pretty sheen that matches the silk, then sewed it to the front piece. The design of the pillow is a little different than I initially planned; it was supposed to be a removeable pillow case, but I lost some material taking the piping off again, so it is stitched closed on all sides.

I’m very happy with how it turned out and that it is FINALLY finished. I hope they like it.

Happy anniversary you guys! May you have 7 years times infinity more.

warp, weave, be happy!

Jennifer

Share this:

  • Click to share on Pinterest (Opens in new window) Pinterest
  • Click to email a link to a friend (Opens in new window) Email
  • Click to share on Facebook (Opens in new window) Facebook
  • Click to share on X (Opens in new window) X
Like Loading...

Try Your Hand at Inkle Gardening

06 Friday Apr 2012

Posted by Jennifer Williams a.k.a. inkledpink in Projects, Tutorials

≈ 13 Comments

Tags

Aleene's glue, batting, carrot, craft, green, inkle, inkle band, needlepoint, orange, projects, rabbit, sew, stash, stitch, stuffing, tatting, tutorial, weave, Weaving

How cute are these little carrots?!

With my non-green thumb, these are the only carrots I can grow – besides, I’m not all that crazy about digging in the dirt. I had a blast designing them. Quick and easy, they are a great stash buster, ok, really they didn’t even make a dent in my stash but, I did use yarn that I had on hand. Carrots come in a rainbow of colors, so use the yarn you have!

If you “grow” your own carrots do let me know how they turn out. I’d love to see pictures and if I get enough I will do a garden post!

You will need:

Materials

  • 1”wide inkle band at least 18” long

*(a little wider or narrower is okay) with two shades of orange 10/2 or 8/2 perle cotton, tatting yarn, or needlepoint yarn. 8/2 perle cotton and needlepoint yarn are a bit thick but will work.

*The carrot in the rabbit’s arms is woven using needlepoint yarn and the other two are woven with both 10/2 perle cotton and tatting yarn.

  • green worsted or sport weight yarn
  • cotton or poly stuffing batting
  • woven fusible interfacing
  • straight pins
  • needle and matching thread (forgot to put in picture –oops!)
  • scissors
  • glue (Alene’s tacky)
  • ruler
  • fine felt-tip marker

Equipment

  • sewing machine (very helpful but optional – can be sewn completely by hand)
  • iron
  • ironing board

Have fun!

I hope you enjoyed the first Inkled Pink tutorial! Don’t forget: show me what you come up with – I’d love to see!

warp, weave, be happy!

Share this:

  • Click to share on Pinterest (Opens in new window) Pinterest
  • Click to email a link to a friend (Opens in new window) Email
  • Click to share on Facebook (Opens in new window) Facebook
  • Click to share on X (Opens in new window) X
Like Loading...

Find on Inkled Pink

Top Posts & Pages

  • Inkle Shoelace Aglets: How To
  • Inkle Band Ornaments
  • An Inkle Bit of Love
  • Give Backstrap Weaving a Chance
  • Project Tutorials
  • Inkle Shoelaces for Boston
  • Daily Band Practice: The Gallery
  • Inkle + Origami

Previously on Inkled Pink

  • Daily Band Practice: Day 67
  • Daily Band Practice: Day 66
  • Daily Band Practice: Day 65
  • Daily Band Practice: Day 64
  • Daily Band Practice: Day 63

Archives

  • March 2021
  • February 2021
  • January 2021
  • August 2016
  • December 2015
  • April 2015
  • March 2015
  • February 2015
  • January 2015
  • June 2013
  • May 2013
  • April 2013
  • March 2013
  • February 2013
  • June 2012
  • May 2012
  • April 2012
  • March 2012
  • February 2012
  • January 2012

Categories

  • Backstrap Weaving
  • Daily Band Practice
  • Design
  • Inkle Looms
  • Inspiration
  • Projects
  • Reading
  • Teaching
  • Tips
  • Travel
  • Tutorials
  • Uncategorized
  • Weaving material
  • Yarn

Enter your email address to follow this blog and receive notifications of new posts by email.

inkled pink

inkled pink

    https://www.instagram.com/inkledpink/

    Welcome Readers!

    counter for wordpress

    Blog at WordPress.com.

    • Subscribe Subscribed
      • inkled pink
      • Join 237 other subscribers
      • Already have a WordPress.com account? Log in now.
      • inkled pink
      • Subscribe Subscribed
      • Sign up
      • Log in
      • Report this content
      • View site in Reader
      • Manage subscriptions
      • Collapse this bar
     

    Loading Comments...
     

      %d