• About Inkle
  • About Me
  • Contact
  • Daily Band Practice: The Gallery
  • Project Tutorials
  • Teaching
  • Translate inkled pink

inkled pink

~ warp, weave, be happy!

inkled pink

Author Archives: Jennifer Williams a.k.a. inkledpink

Daily Band Practice: Day 6

06 Wednesday Jan 2021

Posted by Jennifer Williams a.k.a. inkledpink in Daily Band Practice

≈ 1 Comment

Tags

Daily Band Practice, diamonds, Evelyn Neher, horizontal stripe, pick-up

Day 6, Inkle, by Evelyn Neher, pg. 28
Daily Band Practice: Day 6. The diamond in the middle looks like it is floating.

The day after a few wondering what an outlined motif would look like, Evelyn Neher presents an outlined motif in the book. Of, course she did, because the book is so well written. The outline makes the center diamond look like it is floating. A bit of unweaving happened today, as I tried to put a bit of black pick-up in the middle. When I was almost finished I realized the black wasn’t in the center. It was faster to unweave and reweave without additional pick-up, so no modifications today.

This is a fun idea that I really look forward to exploring more. Today’s pattern is from page 28.

warp, weave, be happy! ~ Jennifer

Share this:

  • Click to share on Pinterest (Opens in new window) Pinterest
  • Click to email a link to a friend (Opens in new window) Email
  • Click to share on Facebook (Opens in new window) Facebook
  • Click to share on X (Opens in new window) X
Like Loading...

Daily Band Practice: Day 5

05 Tuesday Jan 2021

Posted by Jennifer Williams a.k.a. inkledpink in Daily Band Practice

≈ 4 Comments

Tags

Daily Band Practice, Evelyn Neher

From Inkle, by Evelyn Neher, pg. 27

I don’t look ahead at what the next day’s motif will be. I like the anticipation each day. So, it was a pleasant surprise to see this motif today. Compared to the boldness of the motifs the last four days, this one seems so sweet and delicate.

While it is a more basic design than the others, Evelyn Neher introduced it as a technique to use for outlining larger motifs. It was a quick pattern to weave. Indeed, to use it alone as a repeat would make a very attractive band that would be fast to whip up.

Until tomorrow,

warp, weave, be happy! ~ Jennifer

Share this:

  • Click to share on Pinterest (Opens in new window) Pinterest
  • Click to email a link to a friend (Opens in new window) Email
  • Click to share on Facebook (Opens in new window) Facebook
  • Click to share on X (Opens in new window) X
Like Loading...

Daily Band Practice: Day 4

04 Monday Jan 2021

Posted by Jennifer Williams a.k.a. inkledpink in Daily Band Practice

≈ Leave a comment

Tags

Daily Band Practice, Evelyn Neher, horizontal stripe

Day 4: from Inkle, Evelyn Neher, pg 26.

I changed the original motif today. I really liked the black in yesterday’s motif and thought it would be fun to add some today too. The original pattern in Inkle by Evelyn Neher is all white.

The pick-up of this motif uses three warp ends. The thickness really makes the design pop. I can see so many possibilities for incorporating this motif into an overall design.

warp, weave, be happy! ~ Jennifer

Share this:

  • Click to share on Pinterest (Opens in new window) Pinterest
  • Click to email a link to a friend (Opens in new window) Email
  • Click to share on Facebook (Opens in new window) Facebook
  • Click to share on X (Opens in new window) X
Like Loading...

Daily Band Practice: Day 3

03 Sunday Jan 2021

Posted by Jennifer Williams a.k.a. inkledpink in Daily Band Practice

≈ Leave a comment

Tags

Daily Band Practice, horizontal stripe, pick-up

Day 3: page 25 from Inkle by Evelyn Neher.  Uses 2 warp ends at each pick-up.

Day 3 introduces black to the design. I am not sure which I like more. Doing the pick up with two warp ends at a time makes the motifs really bold.

Happily, I found out fellow band weaver, Marieke Kranenburg, of The Bandweeflblog: Adventures in Card Weaving and Band Weaving, is going to do a daily band practice also. The blog is in Dutch, so I translate it to English using Google Translate. Marieke’s daily band practice has a lovely twist that makes it uniquely hers, which any daily practice should be. She has chosen to spend her daily band practice finishing all of her unfinished objects (UFOs), in this case, bands she has pulled of looms in various stages of completion to start other bands. Isn’t this a great idea? We all have a project or two (or more than we are willing to admit), that have been sitting, just waiting to be finished. Read more about how she developed her daily practice here. Three days in and Marieke has already finished three unfinished bands. Way to go! You can follow her daily updates and see those completed bands here (the daily band practice posts are in English).

I am so excited to have unexpected company in my #dailybandpractice. If you start your own daily band practice, please share what you are doing, the more the merrier.

Share this:

  • Click to share on Pinterest (Opens in new window) Pinterest
  • Click to email a link to a friend (Opens in new window) Email
  • Click to share on Facebook (Opens in new window) Facebook
  • Click to share on X (Opens in new window) X
Like Loading...

Daily Band Practice: Day 2

02 Saturday Jan 2021

Posted by Jennifer Williams a.k.a. inkledpink in Daily Band Practice, Design

≈ 10 Comments

Tags

Daily Band Practice, design, horizontal stripe

Day 2

This motif is from page 24 of Inkle by Evelyn Neher. Isn’t it amazing how manipulating a few warps creates such visual impact.

If you look very closely at the band, the motif is off slightly off-centern this is not a mistake. My loom is warped with 23 warp ends, but today’s design is 12 warp ends wide, making it impossible to be exactlyin the center. Before I warped my loom, I looked at all of the patterns I want to use on this band and discovered the widest is 23 warp ends. By warping for the widest motif, I figure I can use the same warp for all the motifs.

Warp, weave, be happy ~ Jennifer

Share this:

  • Click to share on Pinterest (Opens in new window) Pinterest
  • Click to email a link to a friend (Opens in new window) Email
  • Click to share on Facebook (Opens in new window) Facebook
  • Click to share on X (Opens in new window) X
Like Loading...

Daily Band Practice: Day 1

01 Friday Jan 2021

Posted by Jennifer Williams a.k.a. inkledpink in Uncategorized

≈ 6 Comments

Happy New Year!!!!

If 2020 taught me anything, it is that time is a funny thing. This year time seemed to flow like molasses at warp speed. When things started to shut down I thought that we would have so much more time to do the things we never seem to have enough time for, like weaving. But, amazingly, the opposite happened. I seem to have less time for everything, especially weaving. Weaving is very important to me, and yet, I can never find time for it. So, 2021 is all about intentionally making time to use my inkle loom.

This year I have finally committed to do a daily weaving practice. Or should I say a daily band practice. Yes, pun intended. 😊

A few years ago, I took a workshop tapestry weaving workshop taught by Tommye Scanlin. She talked about her practice of weaving a tapestry diary. Her tapestry diaries are a way to practice her art daily and to chronicle her year. That was the first time I had ever heard of a daily weaving practice; the idea has intrigued me since. Her tapestry diaries are amazing. You are sure to enjoy them and should peruse her gallery of tapestry diaries.

Another artist who has influenced me to do this is Windy Chien, author of The Year of Knots. Windy decided to learn to tie a new knot every day for a year and chronicled her practice on Instagram, @theyearofknots. The work she produced for her year of knots is a feast for the eyes.  

A horizontal stripe warp has always been my favorite for pick-up patterns and will be the warp for each band (unless inspiration leads me in a different direction – you never know when inspiration may strike). Choosing this warp perfectly fits with another inkle goal I’ve had for a very long time; to work through one of my favorite inkle books, Evelyn Neher’s self-published book Inkle. Using just her patterns on a horizontal stripe warp will get me through the first 72 days of the year!

Book Inkle, by Evelyn Neher
Self published in 1974. An amazing book and rare find, grab one if you can!

To keep myself on track, I made a few simple rules for myself:

1. Interact with my loom for at least 15 minutes every day, either weaving or warping.

2. Post my progress daily.

3. Enjoy the weaving.

I invite you to follow along with my #dailybandpractice here on my blog, on Instagram @dailybandpractice, or on Facebook @inkledpink. And, here is day 1!

Day 1 of #dailybandpractice. Page 23, Inkle by Evelyn Neher.
Day 1 of #dailybandpractice. Page 23, Inkle by Evelyn Neher

Do you have a daily weaving/fiber/art/ or other creative practice? Have you ever done one in the past?

Other inspirational daily fiber practices you should definitely check out:

               1. One Button A Day (@ginabsilkworks on IG), by Gina Barrett. She hand stitched an amazing button a day for a year. The final collection is museum worthy. Check out both years 2016, and 2020.

               2. One Year of Stitches (@1yearofstitches on IG) by Hannah Claire Somerville. While we have all sheltered in place, Hannah has “stitched in place” since March, a stitch a day. The stitch she chose is so perfect to chronicle such a bizarro year. She has been stitching her way through the years since 2016.

               3. One Year of Stitches and Buttons: Embroidery Hoop 365 Project. In 2017 Ashley Hackshaw aka, Lil Blue Boo, stitched on one embroidery hoop for a year with a mind-bogglingly fantastic array of stitches and buttons. The finished project is a wonder to behold.

Share this:

  • Click to share on Pinterest (Opens in new window) Pinterest
  • Click to email a link to a friend (Opens in new window) Email
  • Click to share on Facebook (Opens in new window) Facebook
  • Click to share on X (Opens in new window) X
Like Loading...

The “Braided” Selvedge

09 Tuesday Aug 2016

Posted by Jennifer Williams a.k.a. inkledpink in Uncategorized

≈ 5 Comments

Tags

braid, inkle band, selvdge


It must match! That is usually my philosophy when it comes to my selvedges and my choice for weft yarn. The little peek-a-boo of color that dots the sides when the weft color does not match the warp color disturbs my sensibilities. But then, one day while looking at all the eye candy on the inkle Facebook page I saw a post by the uber talented inkle weaver Annie MacHale, about a “braided” inkle band edge. Annie has such a wonderful eye for color, it is not a surprise she designed this ingeniously lovely edge. My philosophy quickly became a distant memory. I had to give it a try. The result is now one of my favorite bands! And with Annie’s okay, I share “how to” with you.Inkled Pink Braided edge

To “braid” your selvedges, you need three colors of yarn, preferably with a noticeable color differnce. Use color one for the first warp thread and color two for the second warp thread. Warp the rest of the band according to your pattern until you come to the last two warp threads. Repeat the same process for your last two warp threads as you did for the first two. Use color three as your weft yarn to create a “braid”.

However, beware. . . After I started weaving I realized my selvedges did not match. . .Braided edge

IMG_0393IMG_0388

How could this be? Here is a tip: remember to reverse the warping order of the last two colors when you get to the end. The first and last warp threads show as the “dominant” color. So, by warping the first thread with rust and the last thread with white, the edges where different. To make them match I should have warped the first and last threads with the same color. 

While I did not intend to make my selvedges different colors, I actually like the way it turned out and now, if I choose to, I can recreate the mistake- or shall we say, design element?

So, why is this my favorite band? It feels fantastic! It has the most pleasant hand of any band I have ever woven. And I love the colorway. I do not usually work with autumnal colors.

This was my first time working Patons Yarn. The warp is Patons Grace 100% mercerized cotton and Patons Grace Wool and the weft also is the Patons Grace mercerized cotton. I was a bit nervous that the wool would be “sticky” and I would have trouble making a shed. It stuck a very little, but nothing an extra shimmy of the shuttle at the fell line could not fix. I can not wait to warp another band with only the cotton for the warp. I really am a cotton girl at heart. I just love working with the stuff.

Cheers to “braided” selvedges! Hopefully, you will give it a try the next time you warp up your loom. 

 warp, weave, be happy! ~Jennifer

Share this:

  • Click to share on Pinterest (Opens in new window) Pinterest
  • Click to email a link to a friend (Opens in new window) Email
  • Click to share on Facebook (Opens in new window) Facebook
  • Click to share on X (Opens in new window) X
Like Loading...

Inkle Band Ornaments

21 Monday Dec 2015

Posted by Jennifer Williams a.k.a. inkledpink in Design, Projects

≈ 16 Comments

Tags

beads, christmas, holidays, inkle band, inkle ornament, ornaments, patterns, Weaving

inkledpink.com wreath christmas ornament

My favorite thing about this time of year is pulling out all of the decorations and ornaments that we have collected over the years. Many of our ornaments represent memories that we have made on our travels and milestones for our family. Some are handmade treasures, like the ones lovingly hand stitched every year by my mother-in-law for each of her grandchildren.

The boys love pulling out ornaments and saying, “Mommy made this.” or “This is my ornament that Grandma made for me.” Of course, I needed to design inkle band ornaments to add to our collection! I came up with two; a wreath and a snowflake.

inkledpink.com tutorial snowflake ornament

What you will need for the wreath:

an inkle band 3/4” wide at least 30” long.
scissors
craft glue
thread
12″ of weft yarn
embroidery needle
beads (I used large glass seed beads from a big box craft store)

Step 1: Seal the edges of the inkle band with glue thread (see here).

Step 2: Fold a flat knot into the inkle band, leaving ½ an inch of a tail at the beginning.

inkledpink.com tutorial wreath ornament step1.1

inkledpink.com tutorial wreath ornament step2

inkledpink.com tutorial wreath ornament step3

inkledpink.com tutorial wreath ornament step4

Step 3: Repeat these steps 5 more times. Be sure to always fold in the same direction. You will have something like this:

inkledpink.com tutorial wreath ornament step8.2

Step 4: Make sure both tails are no wider than the width of the knots. Cut and secure to prevent from fraying.

inkledpink.com tutorial wreath ornament step6
inkledpink.com tutorial wreath ornament step5

Step 5: Insert the tails into the back of the first and last knot. Add glue to secure.

inkledpink.com tutorial wreath ornament step7

Step 6: Stitch or glue beads as ornaments. (I stitched them using weft yarn).

inkledpink.com tutorial wreath ornament step8.1

Insert needle between the layers of a row and pull yarn through. Stop before the yarn pulls out.

inkledpink.com tutorial wreath ornament step9

Insert the needle halfway into the next row. Add a bead.

inkledpink.com tutorial wreath ornament step10

Skip a few warp threads, insert the needle back into the row and exit the other side. Pull the yarn snuggly so it does not show.

inkledpink.com tutorial wreath ornament step11

Insert the needle into the last row and pull the yarn through. Pull snuggly to secure. Trim.

Step 7: Add a yarn bow and tie a piece of yarn or string to the ornament and you are finished!

inkledpink.com snowflake ornament tutorial step2

Now for the Inkle Snowflake Ornament.

inkledpink.com tutorial snowflake ornament

For the Inkle Snowflake Ornament you will need:

1/2″ wide inkle band at least 24″ long
3 pipe cleaners
-cut 6 pieces to 2 1/4″
-cut 12 pieces to 1 1/4″
1/4″ bell

Follow steps 1 through 3 for the Inkle Wreath Ornament.

Step 4: Make the branches. Fold 2 small pieces over each of the longer pipe cleaner pieces. Repeat 6 times.

inkledpink.com tutorial snowflake ornament step1
inkledpink.com tutorial snowflake ornament step2
inkledpink.com tutorial snowflake ornament step3
Add a second branch.

Step 5: Add a small drop of glue to the bottom end of each branch. Insert a branch into each knot.

inkledpink.com tutorial snowflake ornament step5

Step 6: Tie a bell to the center of each snowflake and add a string to hang.

inkledpink.com tutorial snowflake ornament2

It may not be cold outside (at least not here in the Sunshine State) but, I think I see snow!

I used very simple warping patterns for both projects, but can only imagine how fantastic they would look with fancier patterns! The wreath is woven with 10/2 perle cotton in both the warp and the weft using the following draft:

wreath draft

For the snowflake, I used size 2, Omega brand nylon crochet thread (both warp and weft) in white (w) and white with silver thread (s) with this pattern:

inkledpink.com snowflake draft.

The crochet nylon is available from online yarn store Creative Yarn Source and some big box craft stores sell it too. It comes in a large array of colors.

Ornaments can be made as large or small as you want by increasing or decreasing the width of the band.

inkledpink.com tutorial wreath-size

No matter the width of the band, it will always take six knots to complete the shape. There must be some mathematical explanation for this, right? If you know, please share!

Happy holidays to you and your family! And as always –

warp, weave, and be happy! ~Jennifer

Share this:

  • Click to share on Pinterest (Opens in new window) Pinterest
  • Click to email a link to a friend (Opens in new window) Email
  • Click to share on Facebook (Opens in new window) Facebook
  • Click to share on X (Opens in new window) X
Like Loading...

Beaded Inkle Band Necklace

24 Friday Apr 2015

Posted by Jennifer Williams a.k.a. inkledpink in Design, Inspiration, Weaving material

≈ 13 Comments

Tags

beads, belt buckle necklace, FTWG, Fulco di Verdura, inkle band, necklace, nylon crochet cotton

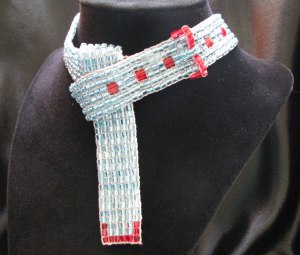
Have you ever seen something that sparked an idea for a project? I hinted at an idea that hit me last December. It happened while I was watching the television show CBS Sunday Morning. The story I saw was about the amazing jewelry designer Fulco di Verdura and a belt buckle necklace he created. What I saw inspired me to recreate his work as an inkle band. The result is this beaded inkle band belt buckle necklace.

inkledpink-beaded-inkle-band-necklace

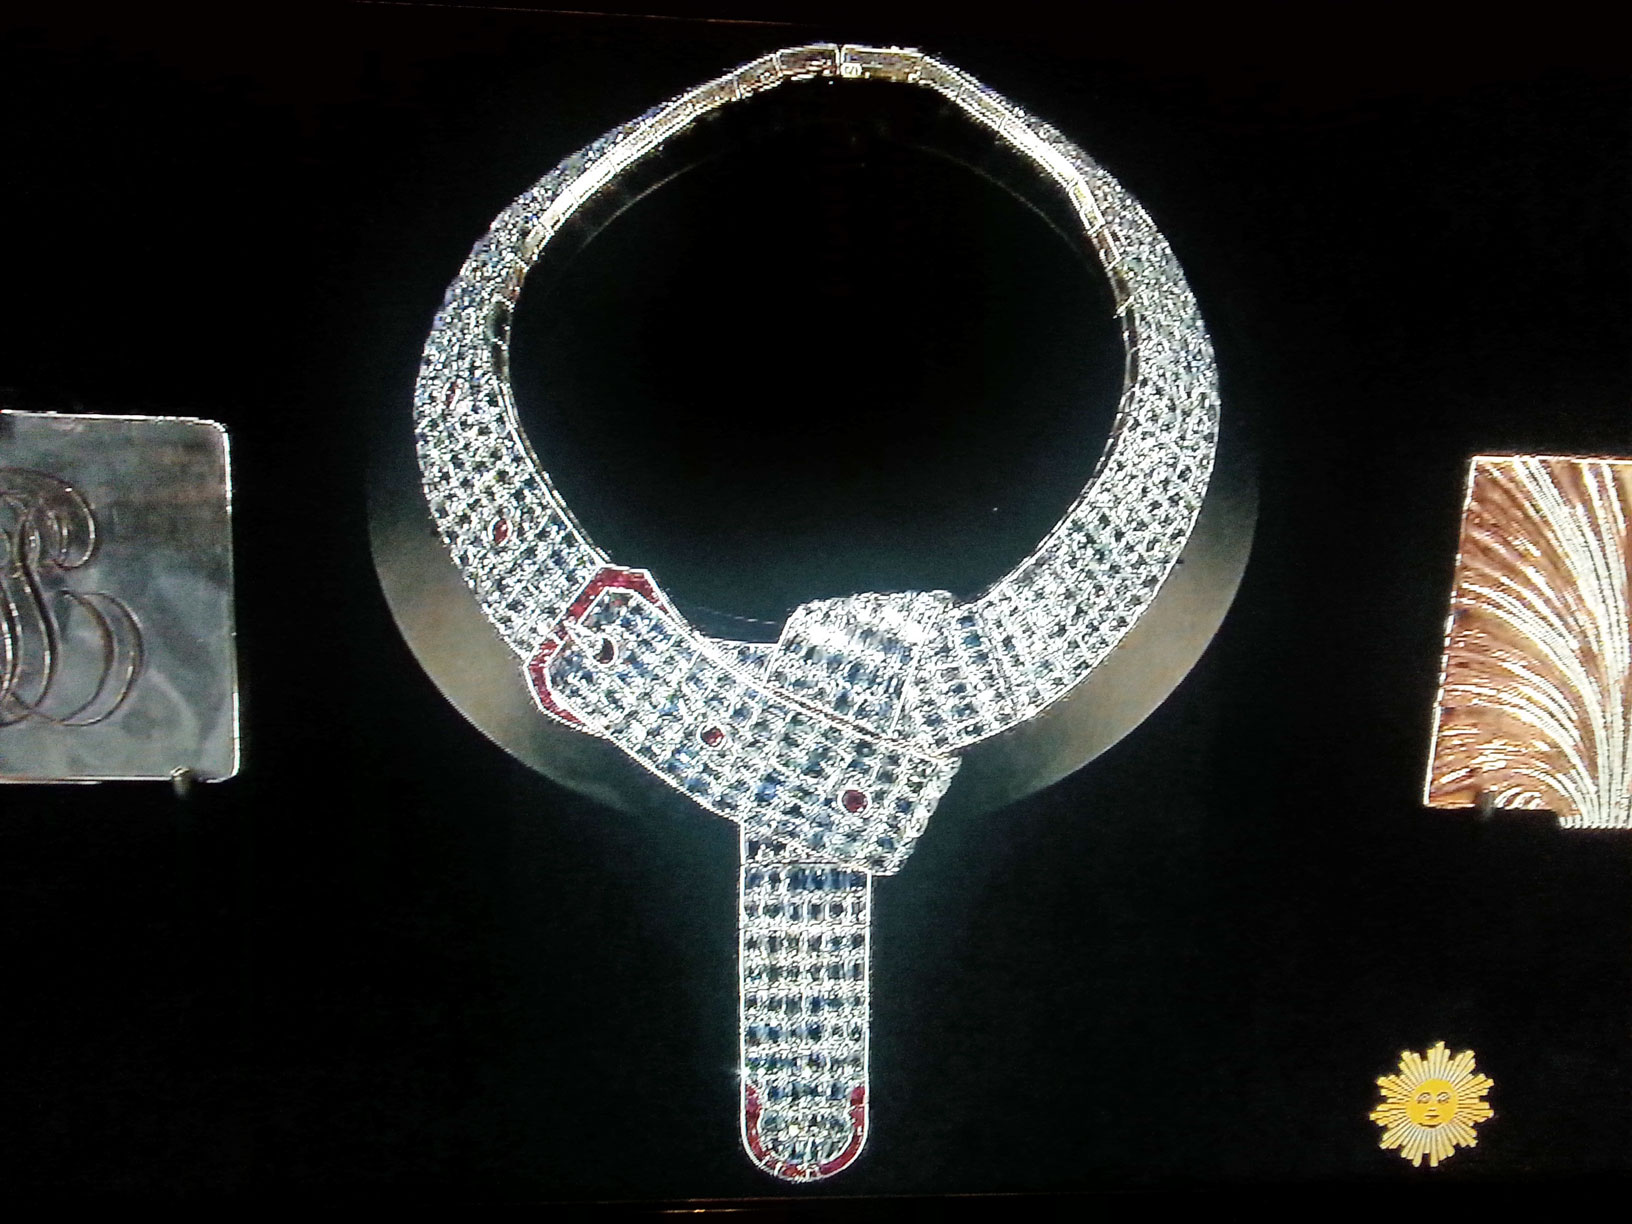
Here is his beautiful original necklace that appeared upon my television that fateful day. Isn’t it a vision of inkle band inspiring loveliness?

Fulco-di-Verdura-buckle-necklace-screen-shot

Yes, this is an actual picture of the screen of my television.

His necklace just screamed inkle band to me. According to this article, it is made of platinum and set with 566 aquamarines and 39 rubies.

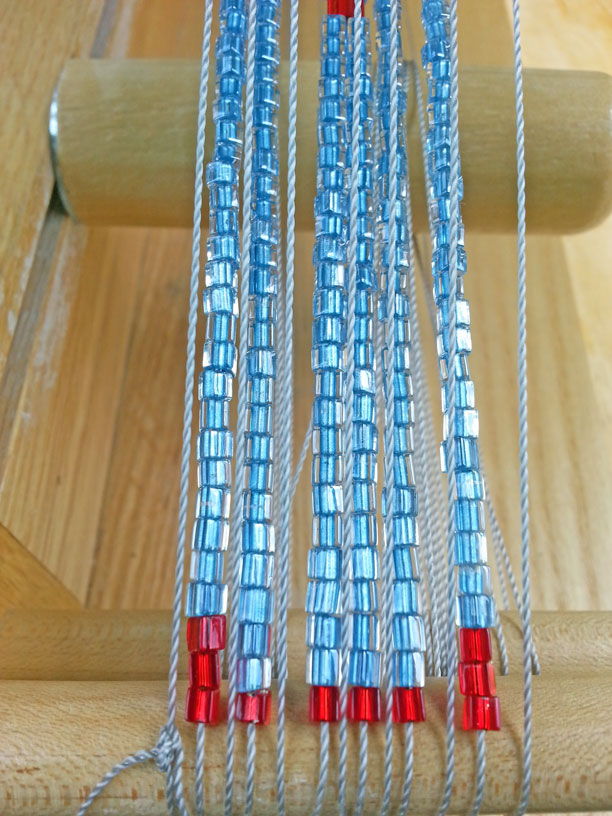
I needed to figure out how to weave a whole inkle band with beads. Both Anne Dixon’s book The Weaver’s Inkle Pattern Directory: 400 Warp-Faced Patterns and Helene Bress’ book Inkle Weaving talk about inkle weaving with beads, but in both books they are only adding a few beads here and there.  In recreating Mr. Verdura’s necklace, I wanted to make a band as close to his design as possible, so in the end I used the method Helene Bress used of adding beads to the warp yarn before winding it onto the loom, just with many more beads!

It took 897 3mm cube Delica seed beads! One bead at a time…

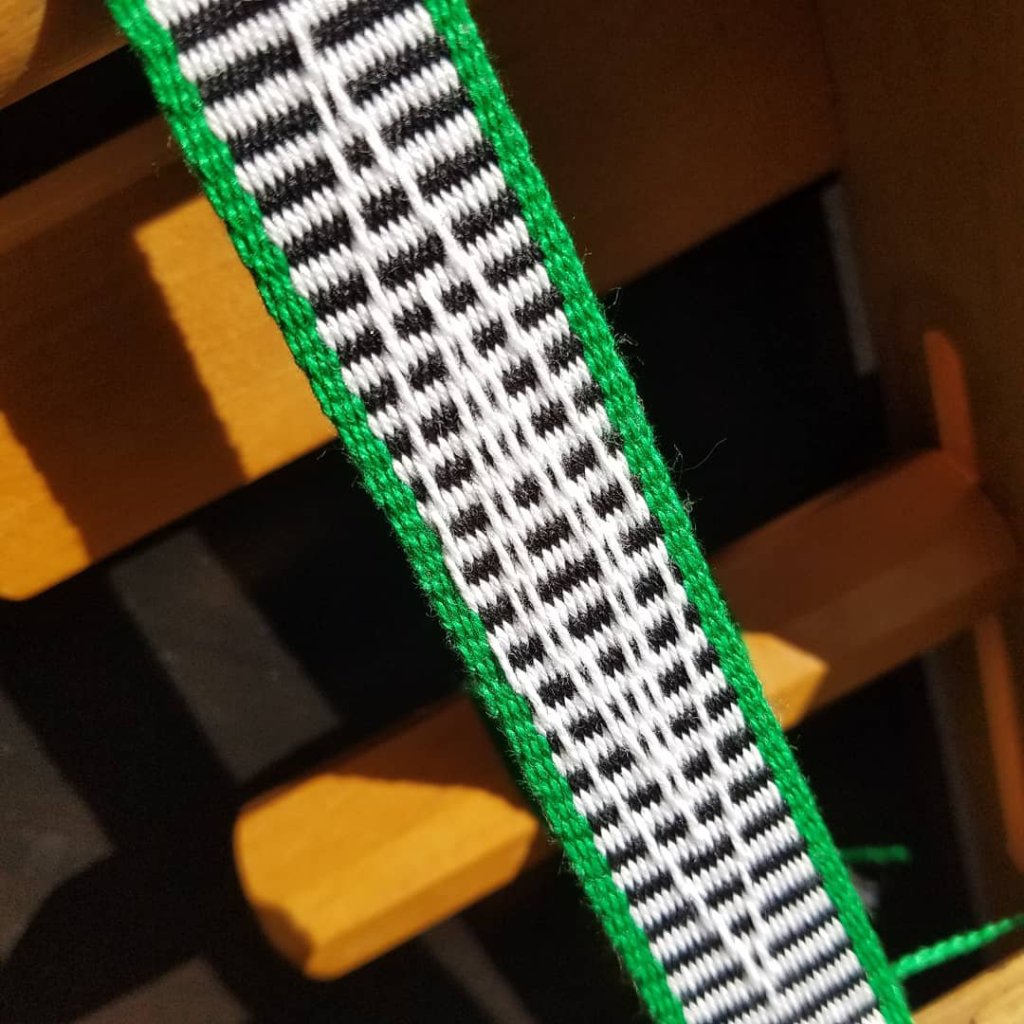
You might remember my post about sampling. Well, so I didn’t run out and buy too many beads, or worse, too few, I wove a few samples first. By doing so, I figured out that 7 rows of weaving with the beads equaled 1 inch (1.27cm) of band. Having that information helped me determine how many tubes of beads I needed in order to reach the length I wanted. (I bought extra. Beads have a tendency to spill when you have 3 cats and 2 little boys.) I put the beaded warp yarn on the loom, remembering to only slide the beads onto the unheddled threads.

beaded-inkle-band-warp

Having my little guys around when I have steal some time to weave causes funny mishaps in the middle of winding on a warp…

Oops!

Oops!

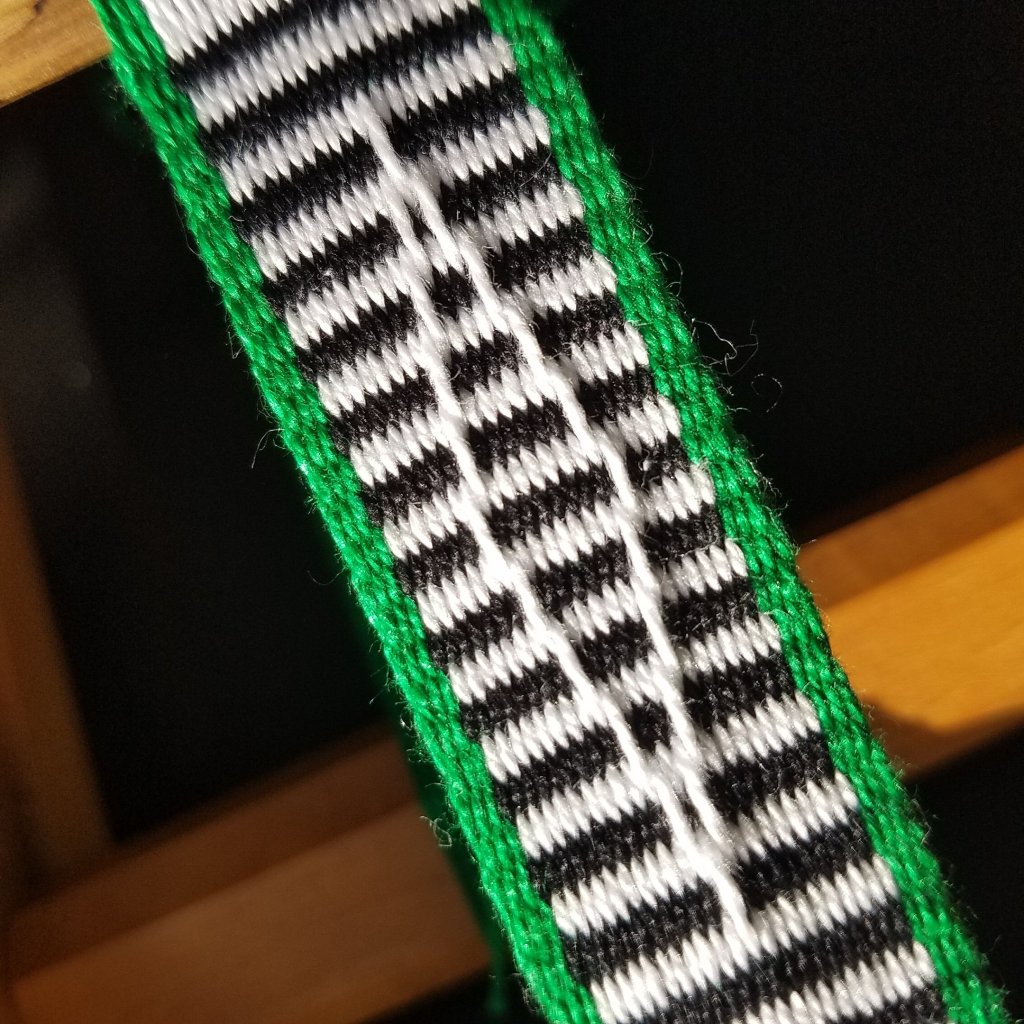
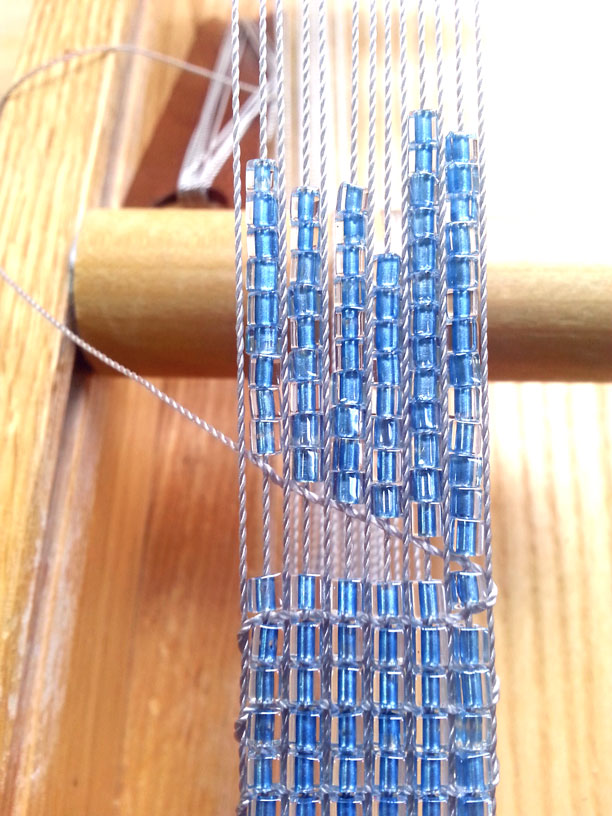
Sampling also showed me it is best to start and end with a non-beaded heddle thread. When I didn’t do so, the selvedges were wobbly and would curl under the beads. The warp for this band is only 13 ends wide, but I think I would do the same process for a beaded inkle band of any width.

beaded-inkle-band-selvedge.

Phew, no more wobbly selvedge.

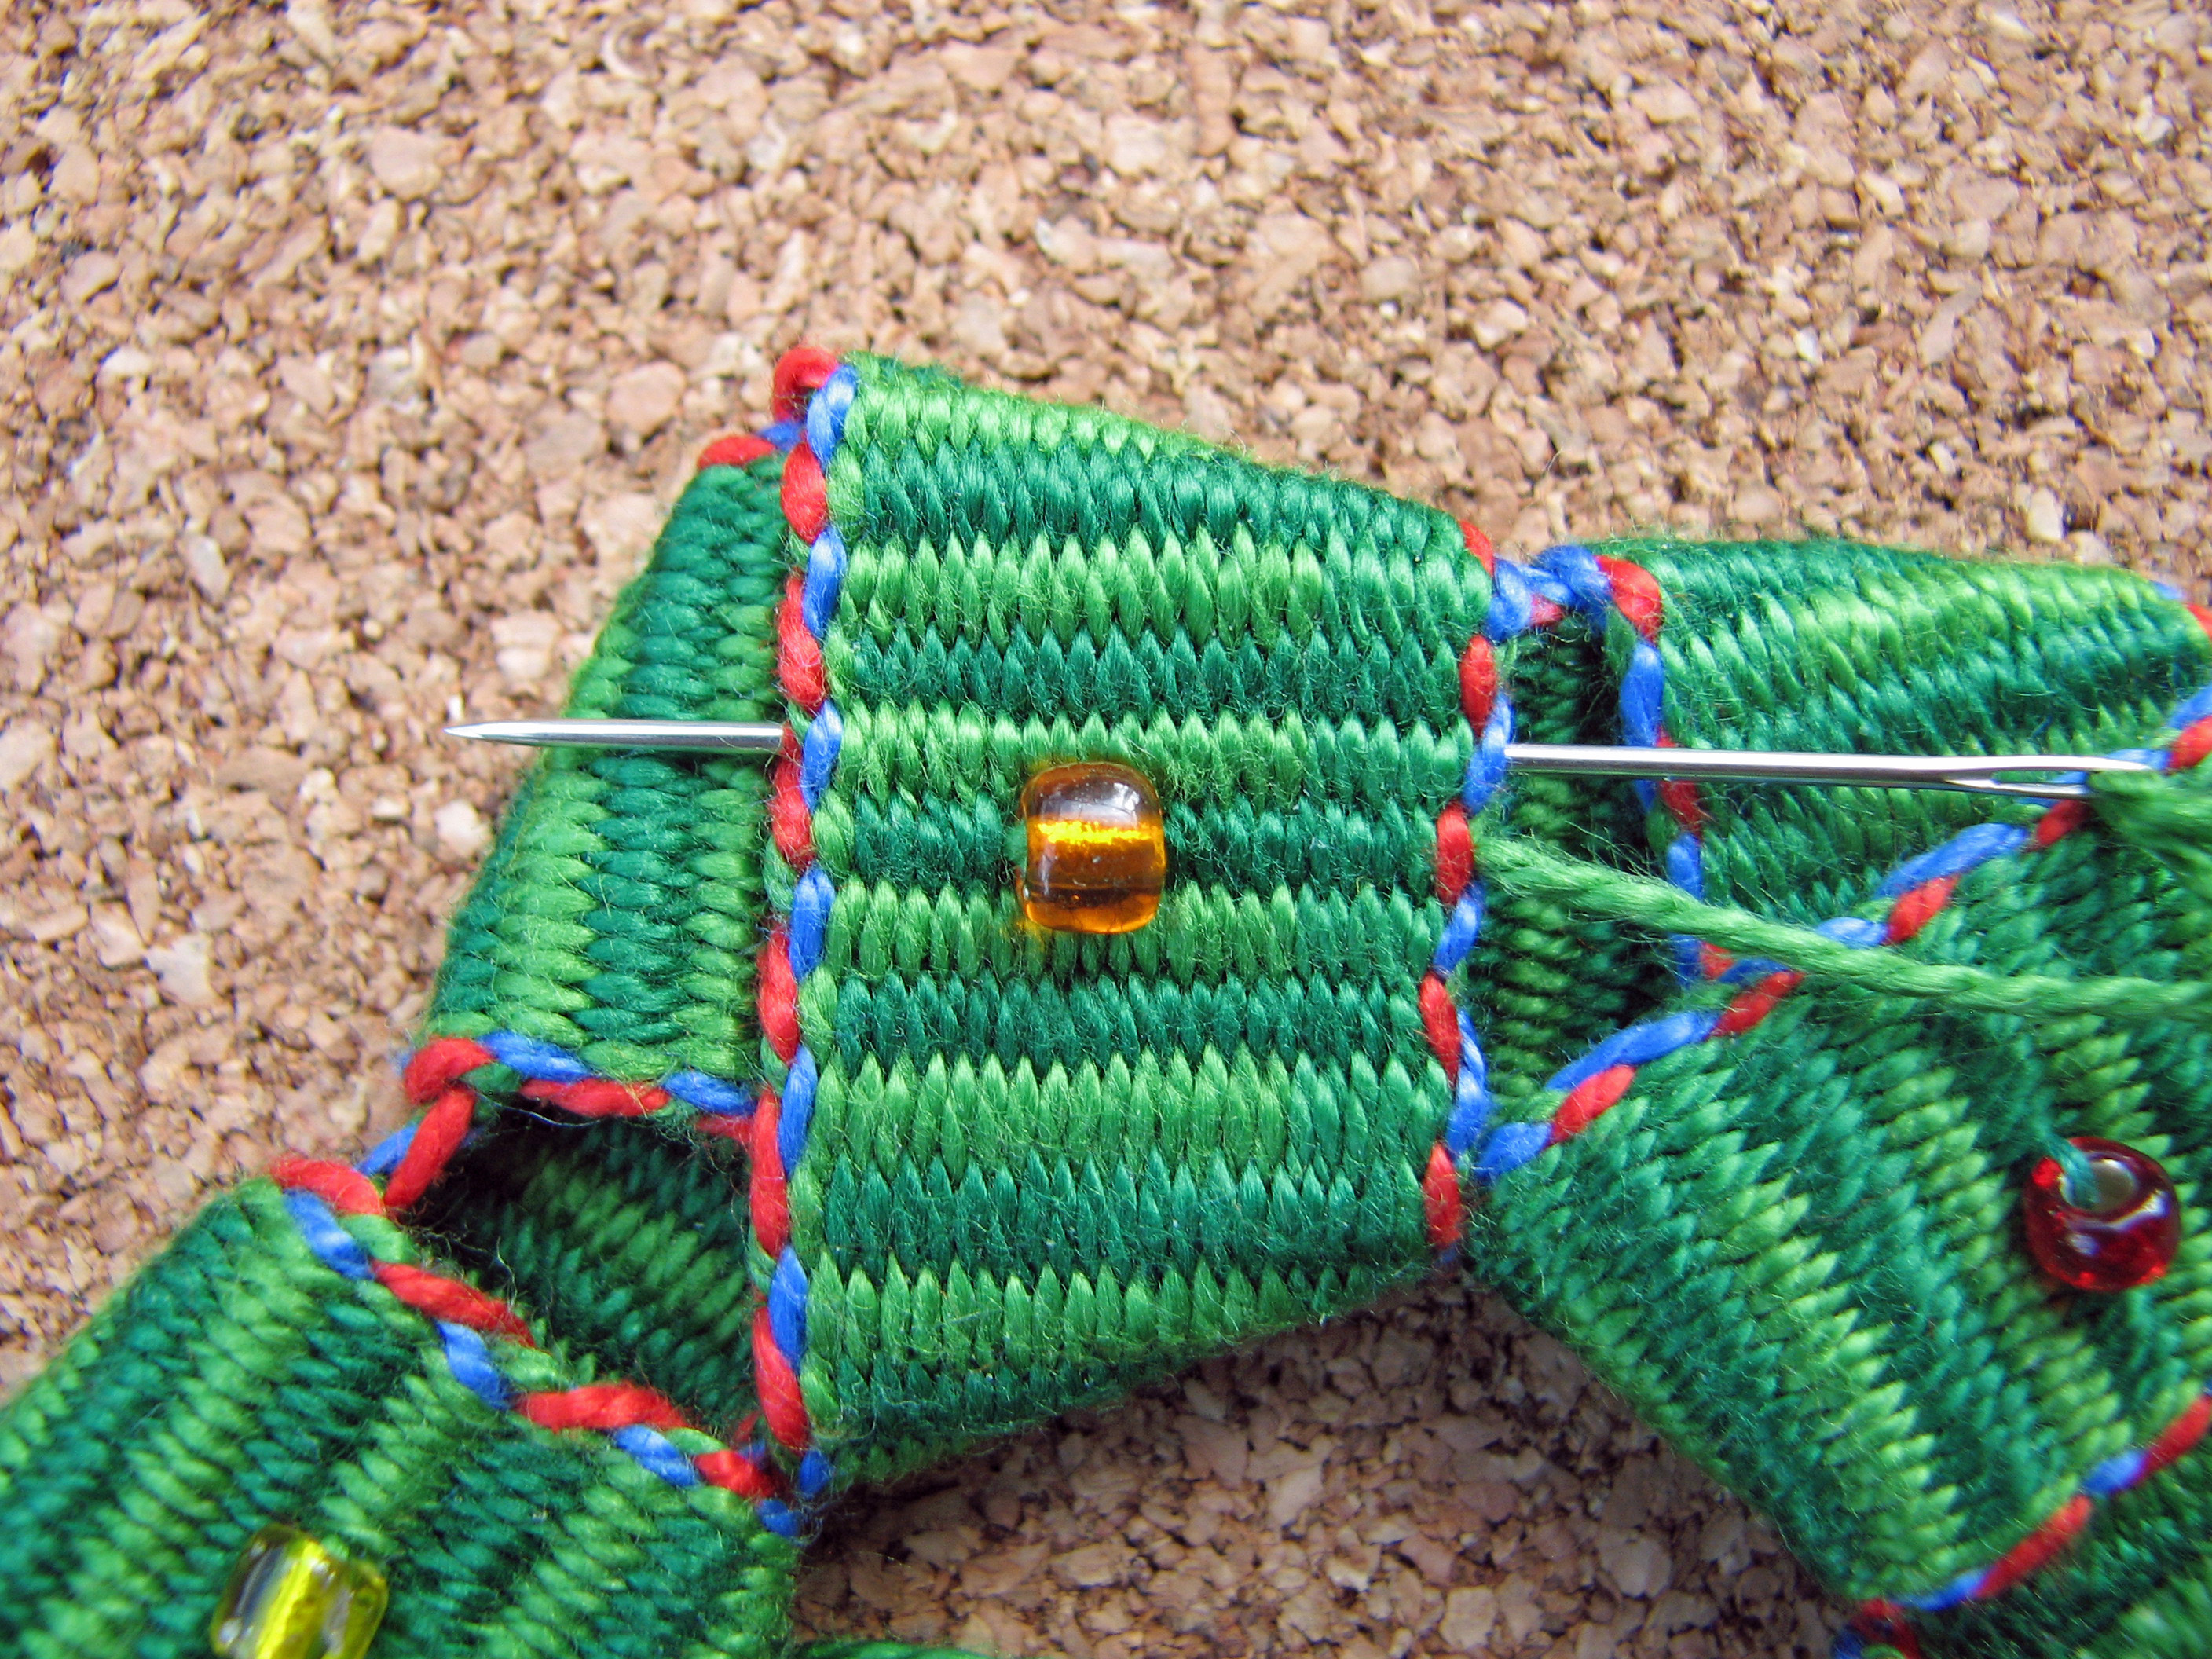
For both the warp and weft I used Omega brand nylon crochet thread, which was slippery enough to allow the beads to slide easily into place. (Sometimes too easily!) To weave the beads into the band, I opened the shed, passed the shuttle, slid the beads into place, changed the shed, beat, then passed the shuttle and slid beads into place again. This process securely locked the beads.

weaving-beaded-inkle-band

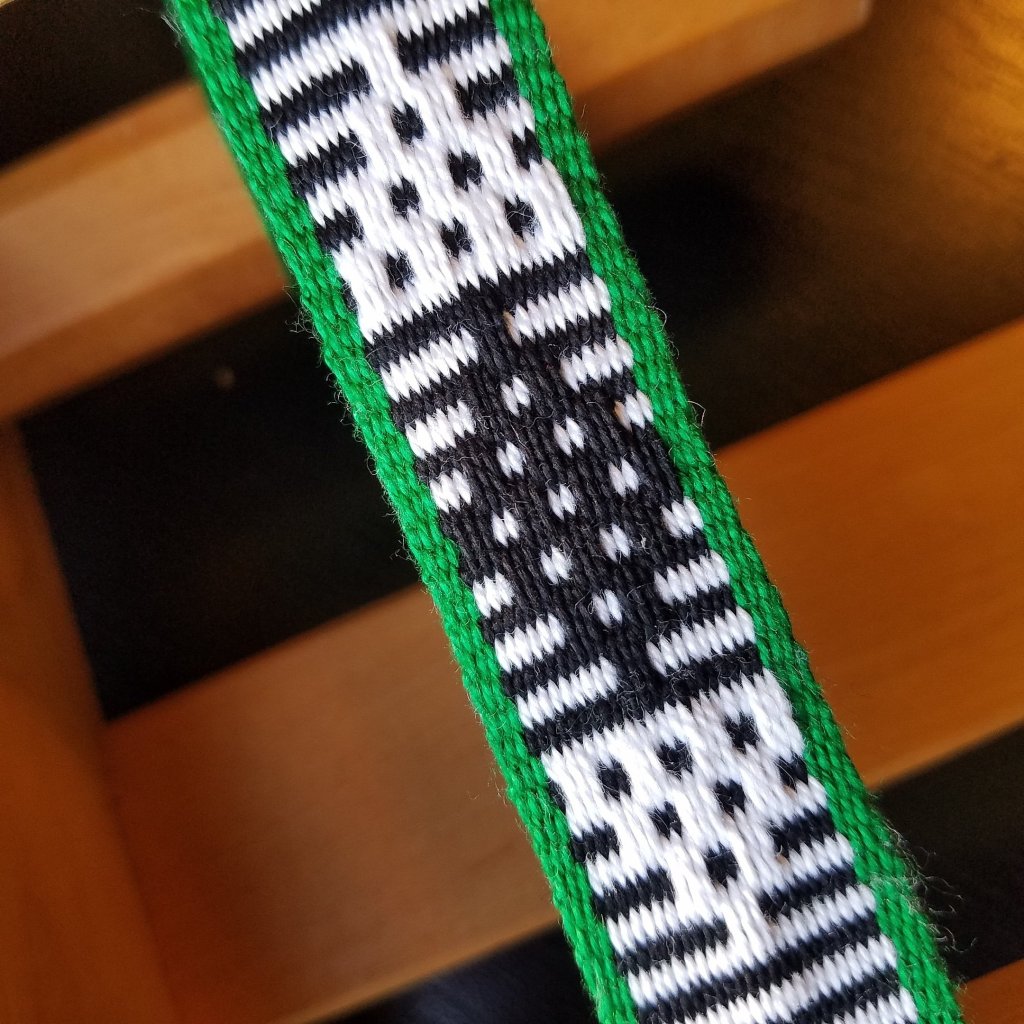
Weaving with the beads essentially causes the band to be a balanced plain weave instead of warp-faced, but the color of the yarn recedes so it still looks warp-faced.

beadedinklebandbalanced weave

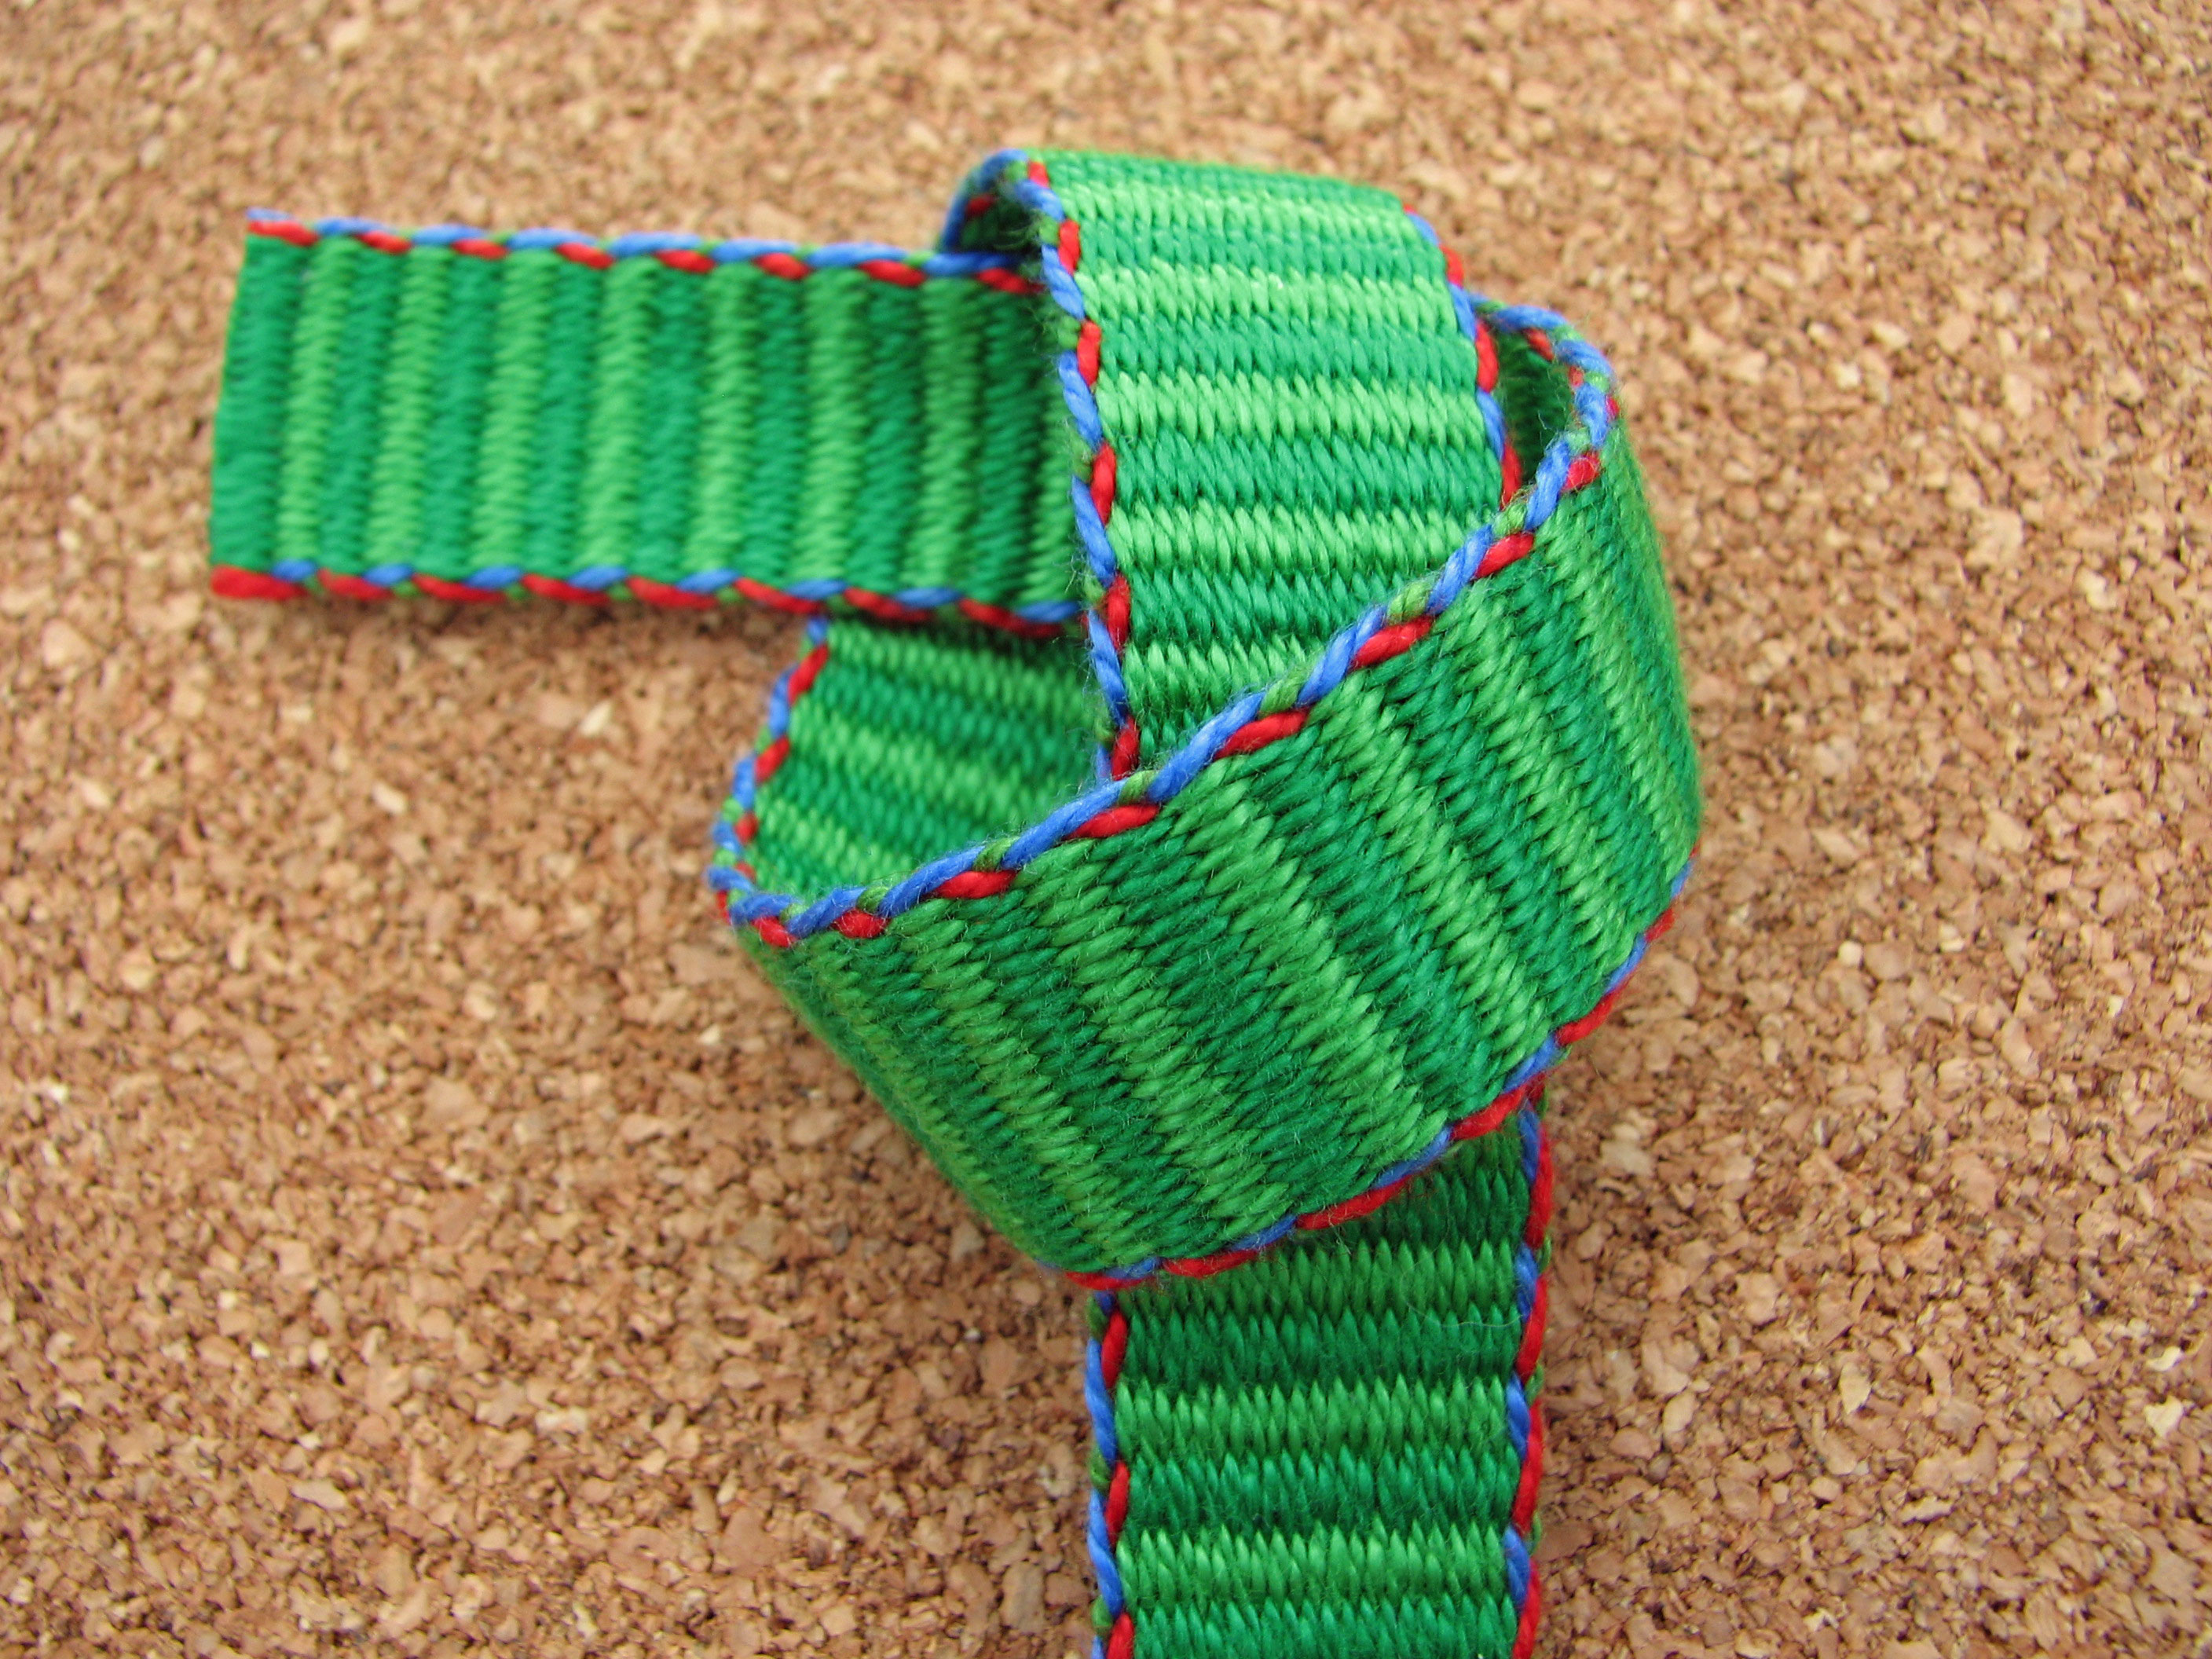
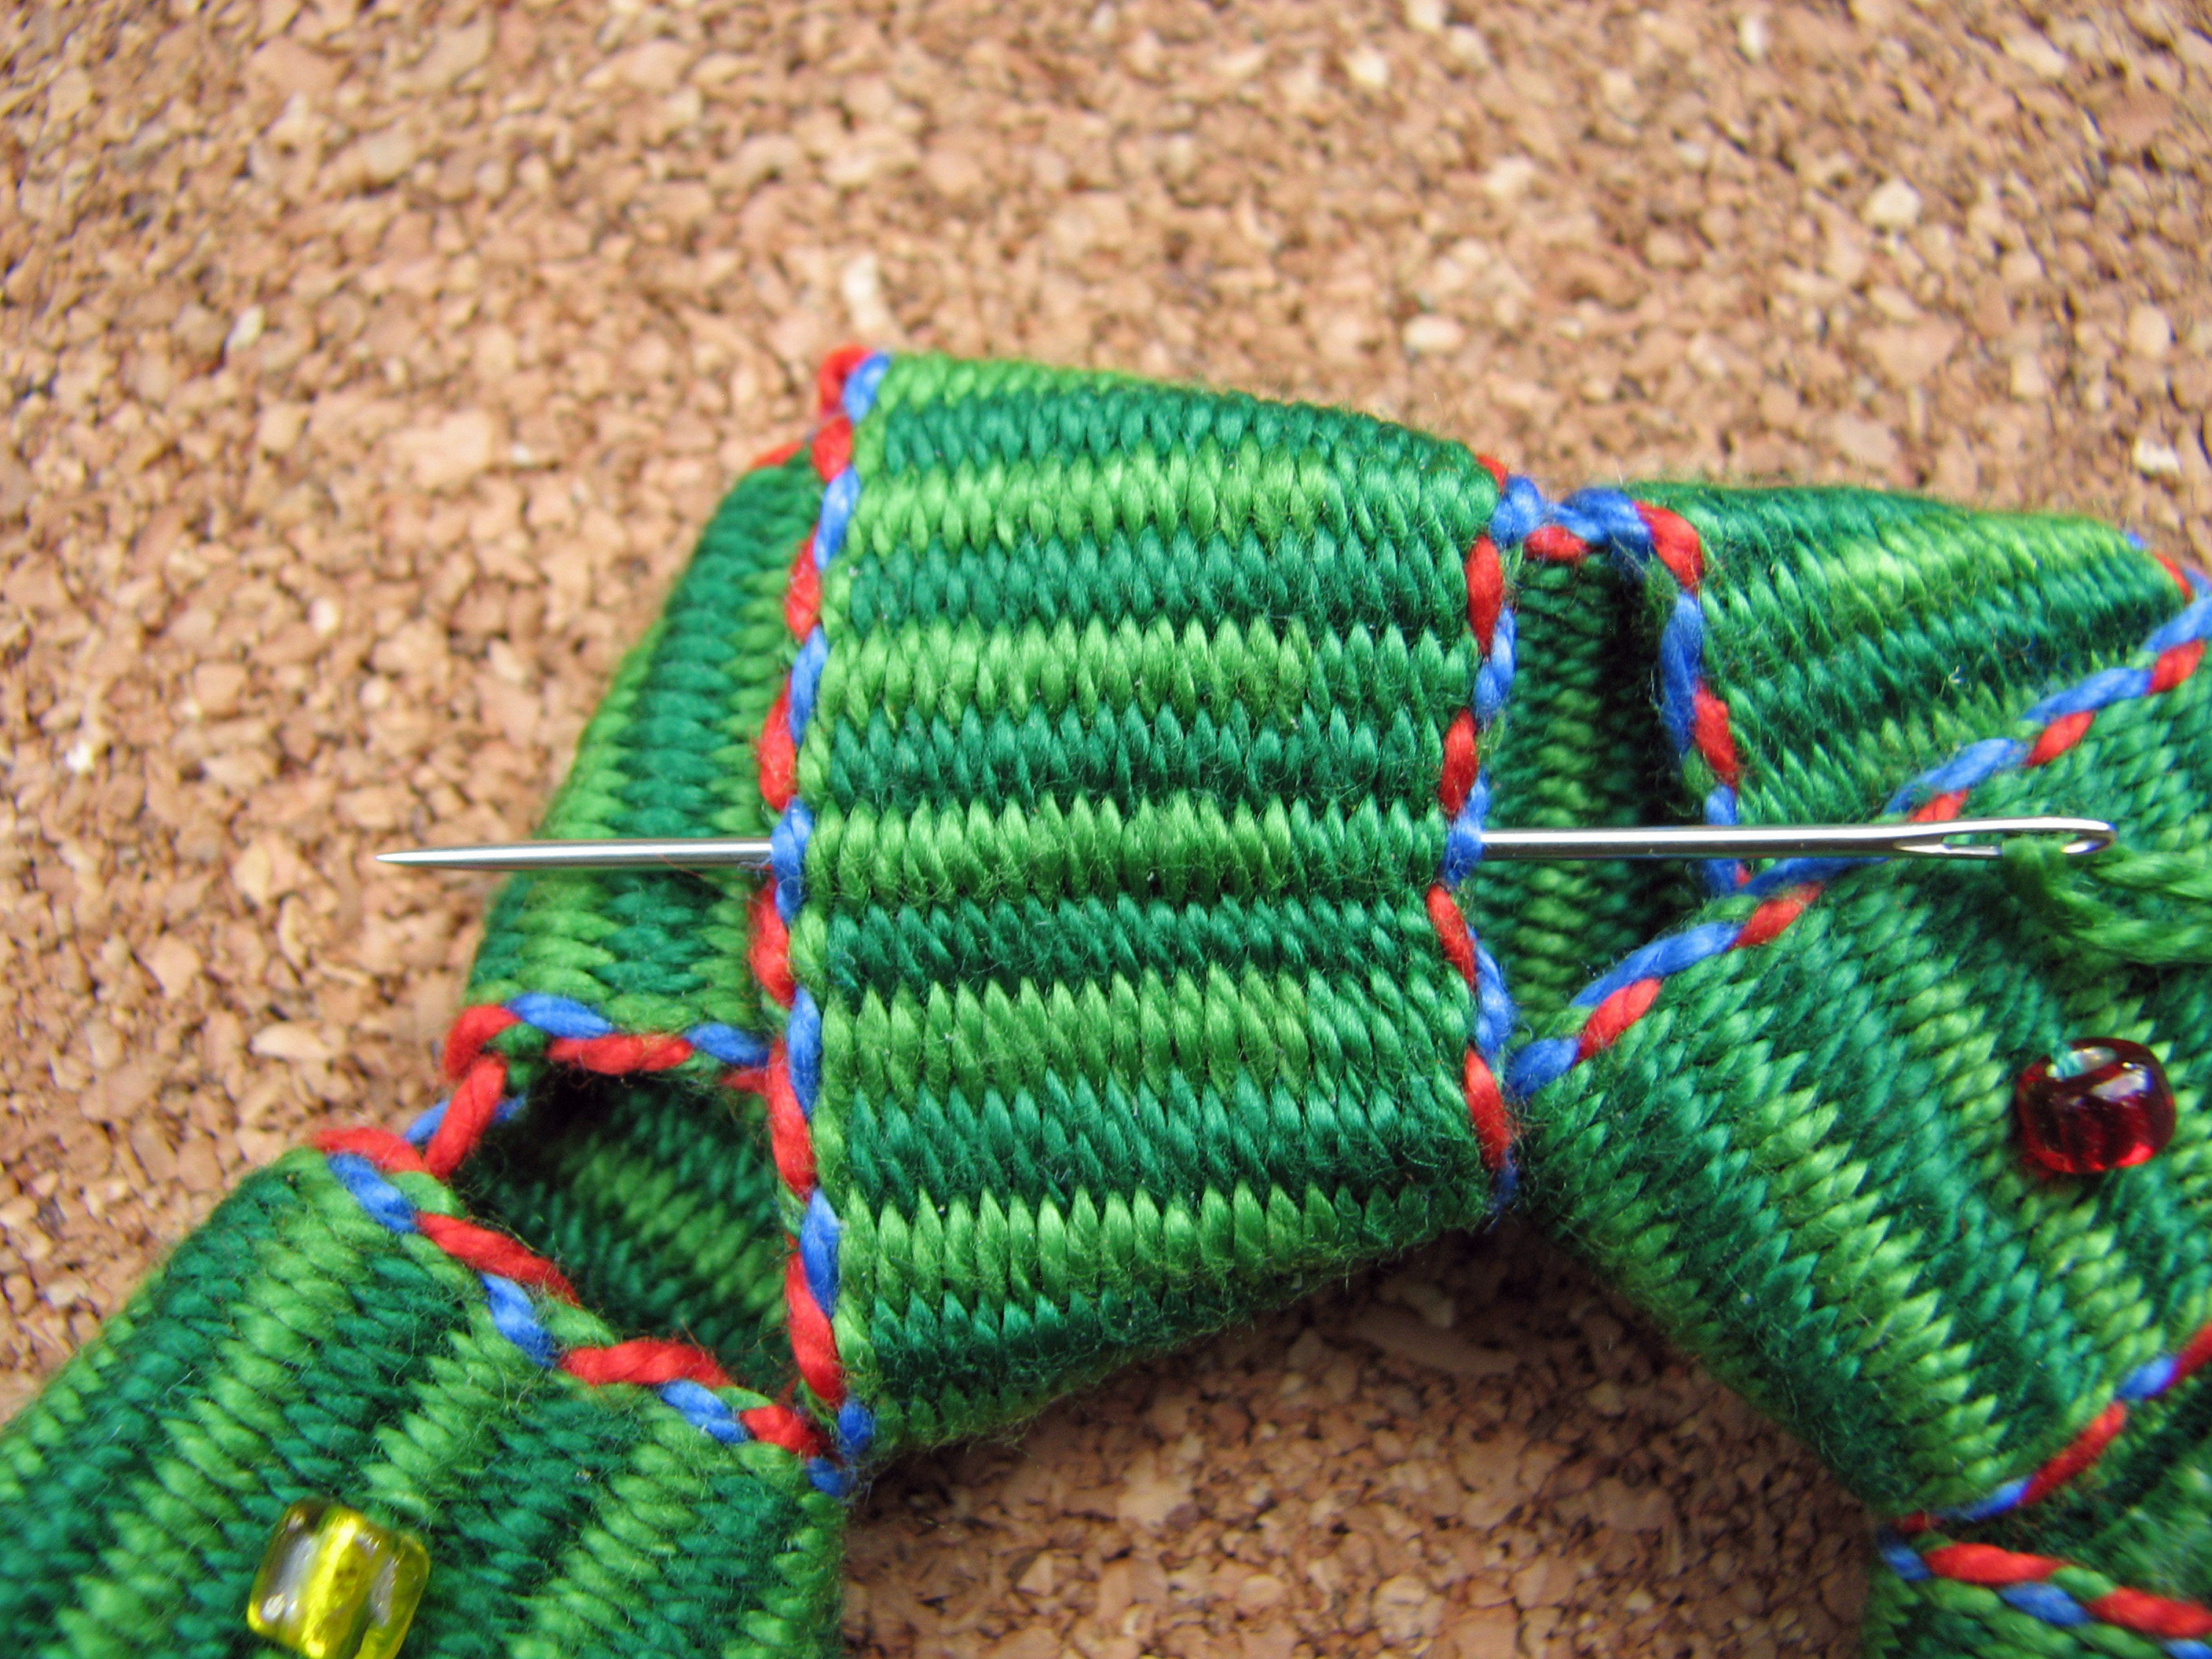
One of the challenges of creating projects with inkle bands is that there is always a fringe to contend with and I wanted a clean, fringeless edge. What to do? My answer was to only weave one pass of the shuttle before adding a row of beads. The beauty of having the beads on the warp is that I was able to weave the fringe back into the beads for a finished, secure edge, that did not ravel. The bead holes are big enough to allow for three strands of fringe to be passed back through without too much effort.

beaded-inkle-band-fringeless-edge

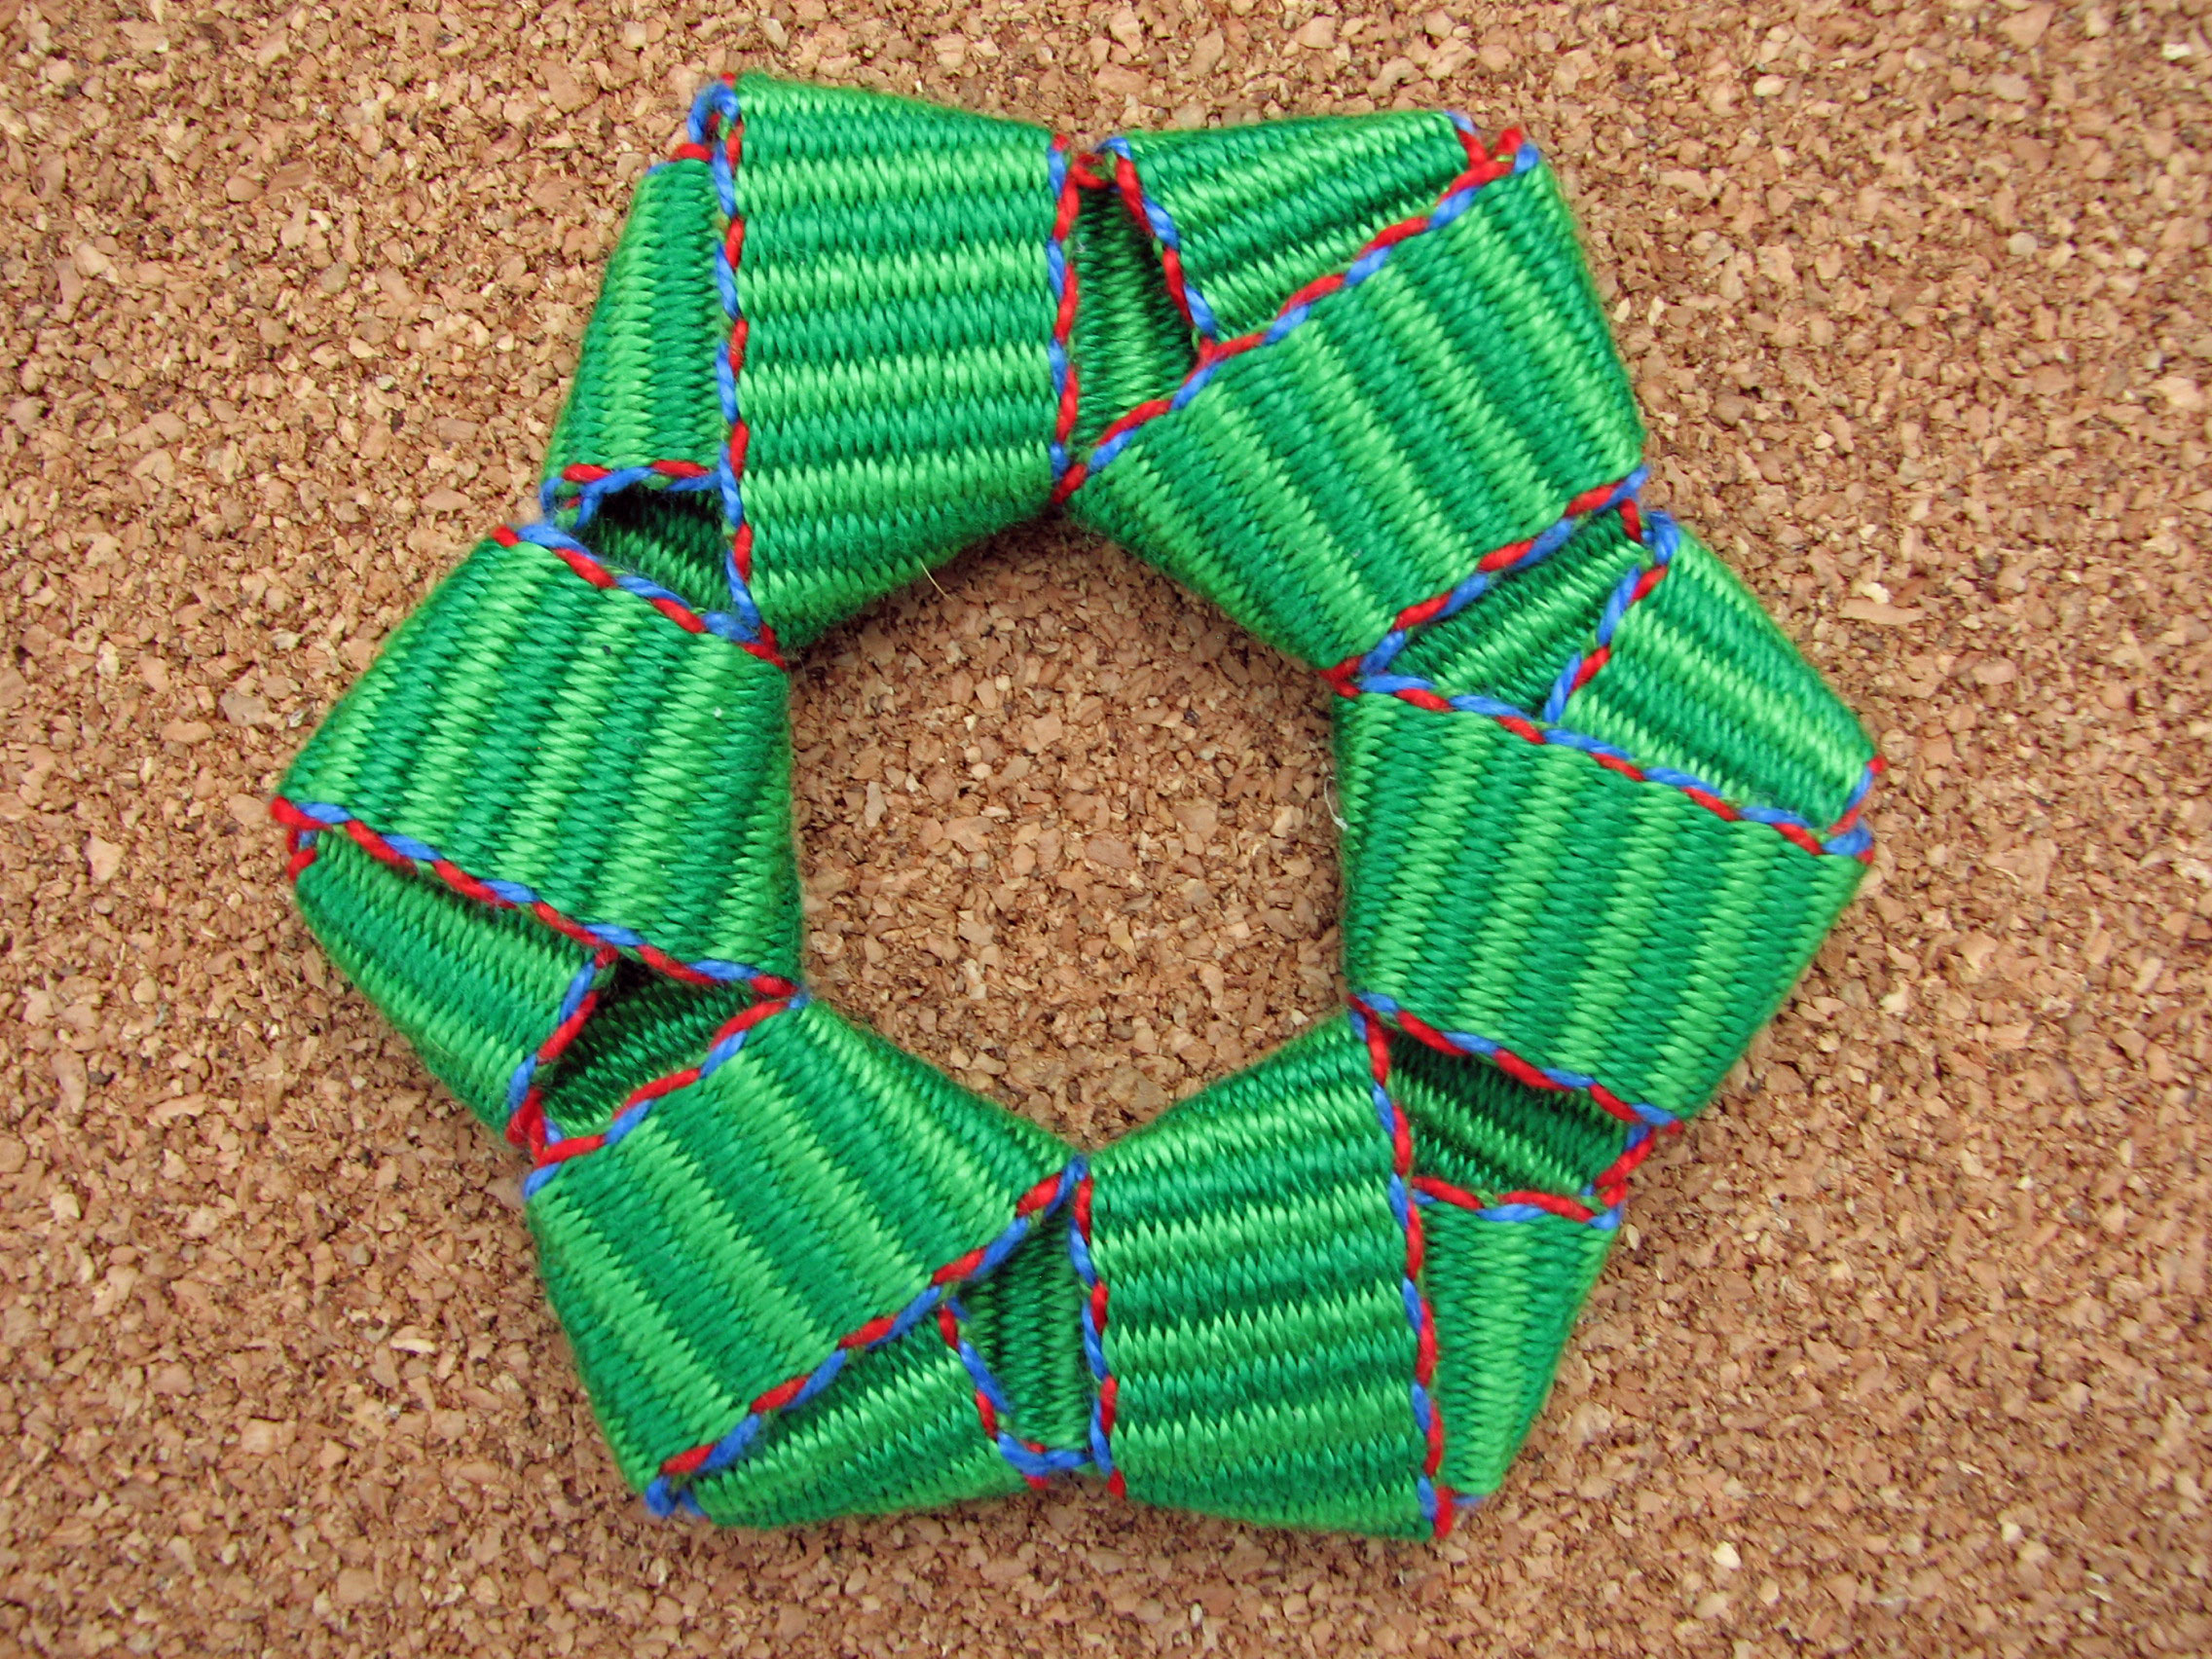
The necklace is actually two pieces. Since it was not made out of fabric, I couldn’t just cut it in half. Instead, while the band was on the loom, I wove a predetermined length, ended it with one shot, advanced the warp, leaving about 12 inches (30.48cm) of unwoven warp and began weaving again, with a clean edge start. But, for the second piece I ended it with about a ½ inch (1.27cm) of plain weave with 3/2 cotton as the weft. This end was then sewn to the back of the band to connect the necklace and make it look like one continuous band.

beadedinklebandheader

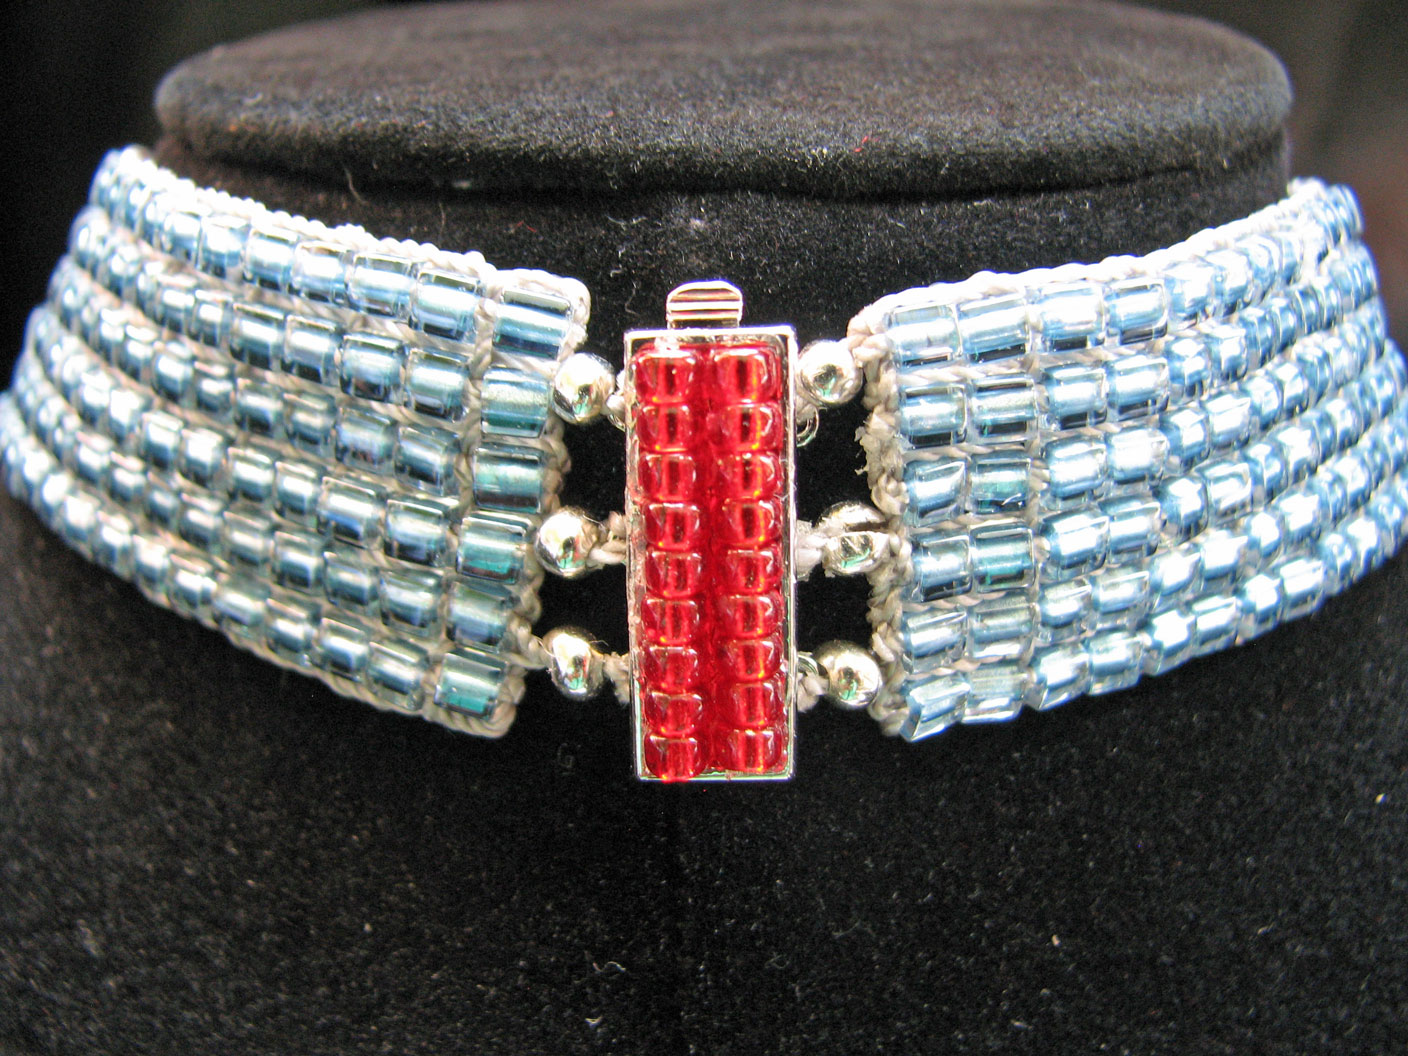
One of my favorite things about the necklace is the clasp I found in the Etsy shop Golden Twin Clasps.

beaded-inkle-band-clasp

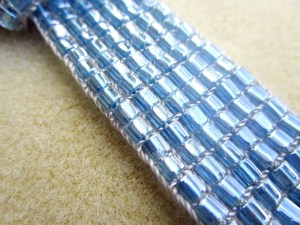
The lighting (ahem, not the photographer) makes this look like a necklace made with lighter beads.

And, that is how I wove with beads to create my beaded inkle band buckle necklace. Thank you, Mr. Fulco di Verdura for the inspiration. Want to see the story that started it all? You can watch it here.

I admit, I love the way my necklace turned out! It has a beautiful drape because of the nylon crochet thread and a pleasant weight since it is woven with beads. My necklace may not be set in platinum with aquamarines and rubies, but it sparkles and feels great on. Yup, it meets all the criteria I have for jewelry! How about you?

Oh, and I did finish the necklace in time to have it for the fashion show and fiber exhibit at the FTWG Conference back in March. It was close, but I did it!

warp, weave, be happy! ~ Jennifer

Share this:

  • Click to share on Pinterest (Opens in new window) Pinterest
  • Click to email a link to a friend (Opens in new window) Email
  • Click to share on Facebook (Opens in new window) Facebook
  • Click to share on X (Opens in new window) X
Like Loading...

Give Backstrap Weaving a Chance

30 Monday Mar 2015

Posted by Jennifer Williams a.k.a. inkledpink in Backstrap Weaving

≈ 6 Comments

Tags

Andean Pebble Weave, backstrap, backstrap loom, Florida Tropical Weavers Guild, inkle band, inkle weaver, Lake Yale, Laverne Waddington, loom, Weaving

Weekend before last, I learned how to make these on a backstrap loom,

backstrap first attempt ip

in a workshop taught by the guru of backstrap weaving, Laverne Waddington,

wpid-20150321_085312.jpg

So nice to meet Laverne in person!

with this view of Lake Yale in Leesburg, FL.

wpid-20150322_074647.jpg

Sunrise on beautiful Lake Yale.

How lucky am I?! My first backstrap weaving workshop was taught by the delightful Laverne Waddington! What a true treat and pleasure. She stopped by the Florida Tropical Weavers Guild Annual Conference to teach a 2 ½ day Andean Pebble Weave class.

Meeting Laverne, after knowing her only from the online inkle group on Ravelry, was great! She is so incredibly nice and a skilled and VERY patient teacher! We started with provided, pre-warped backstrap looms, so after a quick demo and introduction we were able to begin weaving! Have you ever taken a workshop from someone who has a lot of knowledge for the subject, but did not convey the “how to” well? None of that here. Laverne is a natural born teacher! The passion she has for backstrap weaving shows and she is a teacher at heart. Each lesson seamlessly built on the previous lesson. We learned how to wind a warp, make heddles, read and design patterns, and “read the fabric”. The class was well paced, keeping the interest of faster weavers, yet artfully paced as to not lose the slower weavers (uh, yup meaning me!). 

The backstrap I got to use during class.

The backstrap I got to use during class.

Having never done any backstrap weaving before, but being an inkle band weaver, I admit that I anticipated I would take to it easily. WRONG! At least I can say, I liked my selvedges and I was familiar with the rhythm of pick-up. Beyond that, am I ever glad that Laverne is such a wonderfully patient teacher, because I think I gave her patience a test!

4 warps started

4 warps started

Backstrap weaving for me was like driving in England. Driving a car is something I do every day, but put the car and the steering wheel on the opposite side and I’m a mess! Let’s just say, I touched the curb more than a few times while in the UK – no damages or injuries. Similarly, I spent as much time unweaving as I did weaving during the class. Fortunately, unlike driving in England, backstrap weaving is something I enjoyed enough to try again!

Backstrap weaving workshop with Laverne Waddington

Classroom set for open house night.

It was such a creatively fulfilling weekend. Laverne’s workshop taught me so much. If you ever have a chance to take a workshop from this lovely lady, do it! 

I’m working on an inkle band backstrap so I can finish the bands from class. Spending that much time around so many fiber loving people was so enriching. I’m inspired to do nothing but weave. I’ll be sharing the results soon.

Andean Pebble Weave backstrap

One of Laverne’s beautiful Andean Pebble Weave backstrap looms.

Oh, what a beautiful setting for all the creativity of the weekend!

Another gorgeous sunrise.

Another gorgeous sunrise.

IMG_0846

Any place that has a Hammock Village has the right idea.

Warp, weave, be happy!

~Jennifer

Share this:

  • Click to share on Pinterest (Opens in new window) Pinterest
  • Click to email a link to a friend (Opens in new window) Email
  • Click to share on Facebook (Opens in new window) Facebook
  • Click to share on X (Opens in new window) X
Like Loading...
← Older posts
Newer posts →

Find on Inkled Pink

Top Posts & Pages

  • Inkle Shoelace Aglets: How To
  • Project Tutorials
  • About Me
  • Daily Band Practice: Day 65
  • A Tisket, A Tasket, Weave an Inkle Basket
  • Inkle Shoelaces for Boston
  • Give Backstrap Weaving a Chance
  • Teaching
  • Beaded Inkle Band Necklace
  • "Painted" Yarn

Previously on Inkled Pink

  • Daily Band Practice: Day 67
  • Daily Band Practice: Day 66
  • Daily Band Practice: Day 65
  • Daily Band Practice: Day 64
  • Daily Band Practice: Day 63

Archives

  • March 2021
  • February 2021
  • January 2021
  • August 2016
  • December 2015
  • April 2015
  • March 2015
  • February 2015
  • January 2015
  • June 2013
  • May 2013
  • April 2013
  • March 2013
  • February 2013
  • June 2012
  • May 2012
  • April 2012
  • March 2012
  • February 2012
  • January 2012

Categories

  • Backstrap Weaving
  • Daily Band Practice
  • Design
  • Inkle Looms
  • Inspiration
  • Projects
  • Reading
  • Teaching
  • Tips
  • Travel
  • Tutorials
  • Uncategorized
  • Weaving material
  • Yarn

Enter your email address to follow this blog and receive notifications of new posts by email.

inkled pink

inkled pink

    https://www.instagram.com/inkledpink/

    Welcome Readers!

    counter for wordpress

    Blog at WordPress.com.

    • Subscribe Subscribed
      • inkled pink
      • Join 230 other subscribers
      • Already have a WordPress.com account? Log in now.
      • inkled pink
      • Subscribe Subscribed
      • Sign up
      • Log in
      • Report this content
      • View site in Reader
      • Manage subscriptions
      • Collapse this bar
     

    Loading Comments...
     

      %d